Continue to Site

Eng-Tips is the largest engineering community on the Internet

Intelligent Work Forums for Engineering Professionals

  • Congratulations KootK on being selected by the Eng-Tips community for having the most helpful posts in the forums last week. Way to Go!

Shell banding in weld to bottom

Status
Not open for further replies.

jrmc

Mechanical
Sep 6, 2008
25
Hello,

in a repair of a tank the shell suffer a distortion in the connection to the bottom anular plate.
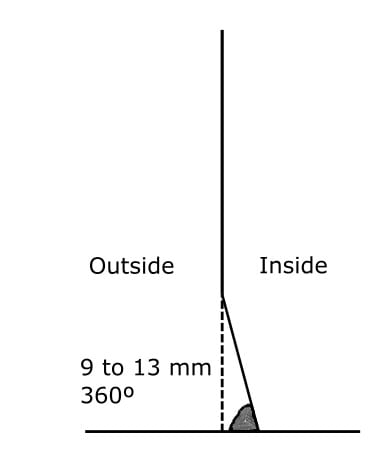
the distortion is 360º , 9 to 13 mm (1/2") to the inside.

I cannot find anything specific to this in API 653, to reference.

most similar is banding between shell limit to 13 mm (1/2") in 900 mm (35"), but it refers localizes and between shells.

what the effect of tensions in this área??

any ideas??
 
Replies continue below

Recommended for you

Shell_Bottom_0811_yebifd.jpg
 
The sketch suggests poor bottom repair. Pls provide more info. (tank dimensions, the repair performed inside, some descriptive pictures ) to get more valuable comments..

Regards
 
See "plumbness in one shell course" in API-650-7.5.2(a), roundness radius tolerance in 7.5.3, and "Local Deviations" 7.5.4(b). I don't have a copy of API-653 handy to see comparable tolerances in it.
 
the deformation stars more or less 270 mm from the bottom.
roundness cannot aply because meausure is above 1 feet (out of the affected area)

plumbness from astm limits 28 mm, but aproving a deformation in the last part of the shell near the critical zone semms nonsense.

Tank dimensions - 19510 mm
Height dimensions - 14060 mm

we replaced bottom and anular plate
 

If the replacement of bottom conforms to the requirements OF API STANDARD 653 9.10.2 and if the new bottom plate is extending outside the shell as required by APT Std 650. ,

The distortion implies shrinkage ... the welding sequence of bottom plates is not proper to minimize the distortion.

My suggestion will be , cutting and re-welding the shell-bottom joint.


The bottom extends 50 mm as requested api.

Some opinions tell me to cut and reweld.
But where i have fundamentatuon in API?

The contractor tell me that is according to API 653 as requested.
Also if cut the weld but the shell will keep distortion.
 
jrmc (Mechanical)(OP) said:
......The contractor tell me that is according to API 653 as requested.
Also if cut the weld but the shell will keep distortion....

If that is acc. to API 653, what is the reason for distortion? incompetence shall not be acc to codes... .. I think the contractor did not follow a correct sequence to minimize the distortion...
The weld should be severed completely the distortion shall be fixed using temporary plugs wedges and re-welded.
 
My problem i do t have any poi t in 653 to clearly not accept this deformation.
They use banding shell not more 13 mm. For that is acceptable according 653?
We apply peaki g or banding in the weld shell to bottom??
I dont find any tolerance in 653 refering the alinement shell to bottom.
With 13 mm de deviation the angle shell to bottom will be 87° instead 90°
 
HTURKAK they tell me distortion is normal.
But i dont find in 653 the tolerance for this.
 
Dear jrmc (Mechanical)(OP);

The codes do not address this situation which you called banding. Banding is the distortion around the horizontal shell welds . In general the result of construction , repair/alteration/reconstruction .

The distortion your sketch pointing out is, plastic deformation of 1st shell course due to incompetent welding of bottom plates rather than banding of horizontal welds.

The followings are from the applicable codes;

API 579-1 2016 Fitness-For-Service = Banding ;
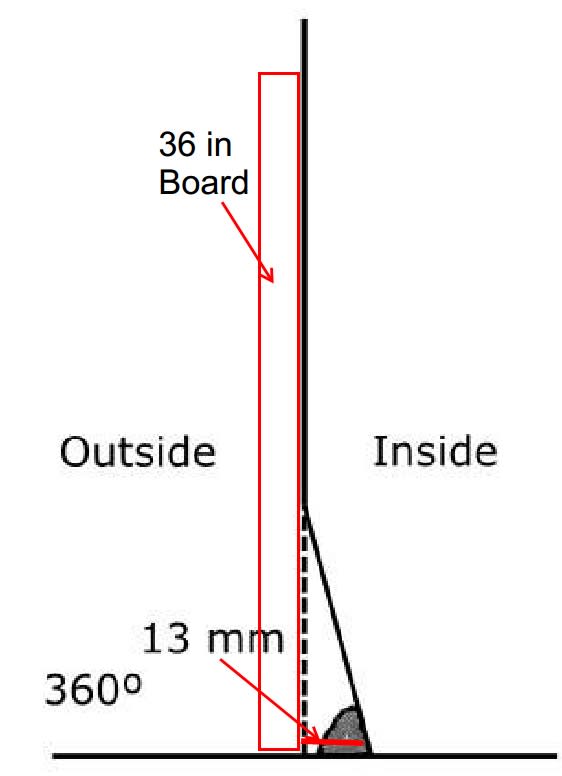
Using a 910 mm (36 in) vertical straight sweep board, banding at
horizontal joints shall not exceed 13 mm (1/2 in).

API 650 7.5.4 Local Deviations =
Local deviations from the theoretical shape (for example, weld discontinuities and flat spots) shall be limited as follows:

b. Deviations (banding) at horizontal weld joints shall not exceed 13 mm (1/2 in.). Banding at horizontal weld joints shall be determined using a straight edge vertical sweep board 900 mm (36 in.) long.

API 653 =10.5.5 Banding
With a vertical sweep board 36-in. long, banding shall not exceed 1 in.

API 653 10.4.3 Bottoms ; 10.4.3.1 After the bottom plates are laid out and tacked, they shall be joined by welding the joints in a sequence that results in the least distortion from shrinkage and provides, as nearly as possible, a plane surface.
Deviation angle is 3degr. as per information. If we assume 13 mm horizontal deviation, plastic hinge height will be ; h=13/ TAN(3deg) =250 mm and plastic strain will be 5.5 % . (acceptable strains typically 2 percent - 3 percent)


The answer may vary as per your position . My personnel answer will be, if i were the consultant or client , i would reject and ask for fixing the shell.

 
my question is the tolerance of acceptance.

In API 653 i dont find any indication about tolerances of acceptance of deviation of shell to bottom weld.
The FFS (API 579) is running in parallel.
Banding i understand it´s not the best criteria.

the deformation stars more of less 270 mm from the bottom, using the board 36 in (900 mm) i reach the 13 mm deviation

Untitled_njtvdv.jpg


how can i ask to cut, remove distortion of shell if i dont have support in API 653??
 
Too many questions - not really able to help without actually seeing the tank.
Why would a plate bend at 270 mm above the floor ? - if it is distortion from welding the base plate the whole first course shell plate should have pulled inwards at the bottom.
If the contractor has cut the shell to base plate and then just rewelded it in the location it sat (without jacking / pushing it out to original diameter) it would explain the 13 mm all around problem.
The first course to second course weld has possibly caused tension/shrinkage in the weld so that when the shell to bottom plate is cut the tension is released and the plate pulls inwards - still doesn't explain the 270 mm location of distortion.
Where was your companies Quality surveillance while this was going on ? - this work would have taken weeks, possibly months to complete.
Did you not have an ITP with Hold points before the contractor commenced rewelding ?
As you have stated there is nothing in the codes to help you - the only thing you can possibly query is why a 19510 mm diameter tank is now 19484 mm diameter at the base.
Distortion is normal is not an acceptable statement from the contractor.
Good luck
 
we have contrated the repair including quality surveillance from third entity for quality, repair should be according API 653.
Roundness only meausure one feet above bottom, so outside the area.

what we are looking is distortion tolerances in API 653?' maybee in any questions queries??

i will ask API and see if they can give ther opinion

 
jrmc (Mechanical)(OP) said:
how can i ask to cut, remove distortion of shell if i dont have support in API 653??

Dear jrmc (Mechanical) , I just saw ur comment. Do they have support for their incompetence? Let them show this non -conformance conforming to API 653 and API 650 .

If you are asking what will be the consequences if not fixed... Pls give the material (steel grades etc ) and thickness of annular plate and first course , liquid content , seismicity....

The concern is , stress concentration at 0.25 m level .


Status
Not open for further replies.

Part and Inventory Search

Sponsor