Continue to Site

Eng-Tips is the largest engineering community on the Internet

Intelligent Work Forums for Engineering Professionals

  • Congratulations waross on being selected by the Eng-Tips community for having the most helpful posts in the forums last week. Way to Go!

Unusual residential structure response 4

Status
Not open for further replies.

EDB9

Structural
May 17, 2019
63
Hello,

I am working with a warranty department for a major home builder. A residence that took occupancy last year is a large three story residence with a slab on grade and turndowns around the perimeter. The lot was a cut lot and the slab bears fully on residual soil. We had no involvement with the initial site testing and I have a one pager that says it’s good. Well I’m questioning that entirely because the house has thousands of nail pops, drywall separations, molding separations, and they increase in numbers daily. A brand new house should not do this! Across the street is another development being cleared and grubbed immediately adjacent, and goes for probably about a mile. I had HABs conducted and found extremely soft blow counts, from 1 to 4 on the front left side but as you went to the rear left side, the counts were mostly acceptable >8. Lab testing indicated mostly ML, MH, and SM. All samples were damp or wet with no groundwater table found at 10’. Organics are present in some samples that haven’t been tested yet. It has been a rather wetter season lately so I suspect that’s why the moisture is retaining. I am at a loss of what could truly be causing this. There was information on the subdivision geotech report stating two lots over was a large organics pit that required soil remediation, but that was a fill lot anyways. I did a quick perimeter check to see if I could see any drainage issues or cracks in the slab but it was pouring rain so it was a rushed effort and I was sans umbrella. I couldn’t see the interior slab because of the floor coverings but I would have expected to see something somewhere in the floor tiles if there was differential settlement occurring. Only in the vertically mounted tiles did I see any separation.

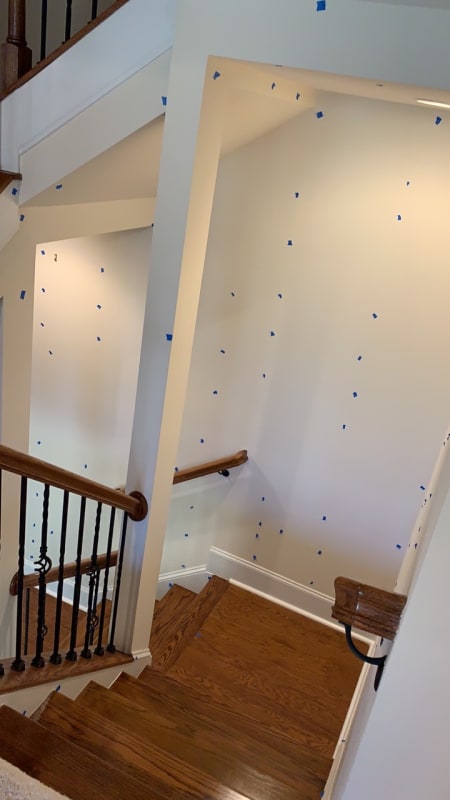
Here is a sample picture of the stairs to the next floor up. The blue painters tape are where the homeowner has marked all the spots that have pops, pulls, separations, etc. The landing in the photo is one of two bouncy areas with excessive deflection.
8BC536F0-BA09-469B-9598-0D39A3B43381_rqejy6.jpg


The warranty department made repairs once already this past winter and within a week they all started coming back! So they stopped all repairs until we can fix the source of the issue causing the distress.

Here’s the big question. How do I fix this? I really don’t want to have to bring a drill out and do SPTs but if that’s the only option, then that’s gonna have to be what happens.

Has anyone ever experienced issues like this? If so, what was the issue and fix?
 
Replies continue below

Recommended for you

I was thinking at least one per floor at a minimum along the exterior and the same for the interior walls. I want to do them near the floor so they won’t be an eye sore. I’m wondering if when we cut the drywall out, if it’s a solid cut, we can tape it back into place. It won’t be hard to find the nails because they’re already popped. The homeowner put blue painters tape on every defect he could find so I figure if I add a little more tape to the walls at the lower levels, it shouldn’t be an issue. Now the horizontal surfaces are going to be trickier to test but they did have some excessive floor deflection in the master bedroom which I recommended opening up the subfloor so I could see the joist hangers. I reviewed the floor framing and they used code minimums for deflection and nearly maxed out the spans for the I-joists with only a foot to spare. I hate when builders attempt max out the margin... perhaps I prefer conservatism because you can’t make wiggle room when you take the “cost effective” route. They did the same design in other area without any bounce. The affected area felt like a trampoline almost it was physically detectable so I’m wondering if they hung them tightly or if that one area is shrinking too and pulling away from the LVL that’s supporting the I joists.
 
I don't think you need to cut any drywall except for a hole maybe 1/2" diam.. With that long sensor or even without and using a rod inserted in a hole, the dial gauge feeler only needs to get to that inserted rod or , with the long sensor rod, just to get that rod to the bottom of the hole in the stud. Pretty small a thing visually. If the seating of the gauge foot plate on the drywall is uneven, and a small plate needs to be on the drywall, paint it to match. You could even put an electrical box blank cover at each place. Screw to the stud with wood screw. I'd not skimp on measuring spots. These places , with the blank cover, could remain forever.
 
The one fortunate thing is the drywall isn’t painted. The homeowner has been waiting to paint until repairs are completed. They went thru the house and attempted repairs once already so it’s pretty much bare with tons of patchwork at this point. The reason I want to cut into the drywall is so I can visually inspect the studs and sill. I have a hunch it’s gonna be moldy. We’ve had excessive rain this spring and I wouldn’t be surprised one bit, especially considering the amount of moisture that’s not draining away from the house. Moisture contents were high on the left side of the residence and I suspect infiltration is occurring. There’s a longitudinal mortar crack running the entire side wall as well and no weep holes... thus I want to confirm my theory.


Erica
Structural and Geotechnical Engineer (yes I know this isn’t a typical combo)
 
OK However,without a back-up program, I'd want to have plenty of spare readings. Trees don't grow uniform and knots will restrict shrinkage. They can be in places not usually visible, such as closets, behind doors that usually stand open, behind wall curtains,furniture,etc. Be prepared for some that hardy show a movement. Now's the time to "don't spare the horses".

Edit: This "testing" is creating a possibility of measuring dimensions of the wood where some form of venting is not the same as other areas. If this venting dries the test area more than undisturbed areas, it affects the result you want. One might even go so far as returning everything as close to9 undisturbed as possible when not actually reading dimensions.. This could be even mean closing (sealing) up the test "area" with plastic when not actually reading dimensions.. Thus I'd be very leery of opening up to look for mold.. That hole bored in stud should be only large enough to allow access for the probe, etc. Then plug it when not measuring. We (you)are looking for changes in thousandths of an inch. One could sue a gauge with units of 1/10 of a thousand, but usually they have little range of change.
 
More from OG. You also need to isolate the thickness info bet ween wood and drywall. The above para method measure the combination. Separate drywall measurements can be simple. Make a hole to wood. Inert a screw with thin slot to make a "smooth" surface. Measure depth with the depth gauge. Keeping hole to wood small diameter less drying is possible so you don't measure in a dryer part of the area. Hopefully none of the many variables can be reduced some by separating the measurements to each material. Cover with tape when not measuring.

Edit: It might even be meaningful to avoid the screw and just go to the wood. Thus a lot of quick measurements are possible.
 
I’ve got a high sensitive laser distance meter. I wonder if that would be easier to work with than a dial indicator. It has tolerances to the thousands of an inch too. A small caliper could measure the Drywall thickness and I would just subtract the difference.

Erica
Structural and Geotechnical Engineer (yes I know this isn’t a typical combo)
 
All I know is that old stuff works. Unless the new gear is as flexible in use, maybe, but I'd not use on a job like this to "try it".
Forgot to mention any full wall or dry wall horizontal measurements need to take into account the dry wall maybe loose from the studs. Thus press it to the stud when measuring.
 
Gotcha. I like tried and true methods but I can use the alternate for verification.

Thank you OG for all of the great advice!

Erica
Structural and Geotechnical Engineer (yes I know this isn’t a typical combo)
 
EDB9,

It appears that moisture is an issue in this house.

Has anybody looked at moisture moving thru the slab and on into the living area?

You might want to try the following test to see if moisture is moving into the building. Tape a 1 Ft. square piece of plastic vapor barrier to the concrete floor in the lowest part of the building. Leave it in place for at least a week. Then remove and look for moisture on the plastic surface next to the concrete and on the concrete itself. This will reveal if there is a lot of moisture under the floor or trying to move into the building.

You might also want to try several areas for 1 week, 2 weeks and/or 1 month.

Jim

 
Jim: Note this slab is on a vapor barrier. In my experience that wet concrete can take months to dry to a stable situation and we use that plastic test to see if it is OK to place glued on flooring. So here luckily it has the plastic.
 
oldestguy,

I have rarely seen plastic un-reinforced vapor barriers hold up well to the installation process, It has been noted that the soils around the house have moisture in the bore holes. It is my experience that moisture moves from wet to dry volumes. We also use these tests to determine when a steady state of low moisture exists. I haven't seen any numbers revealing the moisture levels in the house. Nail pops usually mean high moisture in the air, studs and/or the drywall boards.

I hope somebody is looking for if and where that moisture is coming from.

Jim

 
Jim,

I’m going to use a moisture meter to check the levels when I go in back to the residence next week. I have the suspicion that it’s coming from the left side of the house and possibly the right as well since it’s moist there too. Their swales are not the best and the soils are plastic and elastic silts in the upper layers which aren’t always the best for drainage.

Erica
Structural and Geotechnical Engineer (yes I know this isn’t a typical combo)
 
EDB9....you just got a wealth of information from oldestguy (OG). He has given you the benefit of many years of seeing the things you are running into and solving more engineering issues than most of us will ever see. Tremendous resource along with slideruleera (SRE). We all benefit from their experience.

As an aside, the moisture in the soil is not the most prominent contributor to the moisture in the house. Take some interior humidity measurements both in the rooms and in the wall cavities. USB temperature/humidity logging devices are relatively inexpensive and can give you a lot of useable data over a few days of monitoring.

 
As Ron well knows we never quit learning.
If not mentioned before (old memory here is short), Take wood moisture readings at many planes, repeated along with dimension readings. It may be too late to really see this, but a plot of moisture a well as dimension readings with time may well show the rate of shrinkage is sufficiently low to do the repair. What is sufficiently low? Ideally none, but be realistic. Then what rate is OK? say .002 per week, per month? Maybe it has to be like .001 per month? Usually trial and error is nice, but here?? Could one room be used as a test area, nailing (or screwing)and observing with different time periods. Just thinking.
 
Postings over the last 6 or 7 days all seem to focus on measuring the moisture levels at various locations /rooms. Perhaps this is appropriate , perhaps not. Who is paying for all this ?? The homeowner??? Cant see him being very satisfied with this approach. Seems to be a consensus that excessive moisture levels are the fundamental cause. Take look at the photo from July 9th. A number of boreholes and or drainage ditches to carry rainfall away from the building might be a lot more cost effective in the long run.
 
miningman,
This is a brand new house, it's the warranty department that is paying for the repairs, not the homeowner.

Ron,
That's exactly what we're planning! Thank goodness for simple technology making life easier these days. It wasn't that way when I started, that's for certain.

OG,
That's how the plan is converging. We know that one check isn't going to cut it so we are going to do some monitoring over the next few months.

Erica
Structural and Geotechnical Engineer (yes I know this isn’t a typical combo)
 
miningman; As I look at this situation I go back and review jobs I've had. My age is 92 and up until recently was darn busy. Anyhow the exact cause here is not fully clear, but I lean to looking at moisture in the wood and possibly drywall as it AFFECTS DIMENSIONS as more likely. However the other factors here may have an influence so some examination there is warranted. I'm sure that the engineer here wants it right because giving an OK to retape, etc and if that fails again certainly can't be an acceptable engineer job. In my past practice having a negative job result was something I could not allow, even if I did work at no cost.
 
I am late to this discussion, but a couple of questions:

Did I understand that the screws are backing out? Have you extracted any screws to see what kind were used?

Is that black line on the photo a crack or the edge of a damp course membrane?

Does the house have central air conditioning? Are the windows and doors closed at all times?

I think the probability is that this is something to do with the drywall installation/wall construction, and I would want a sheet removed from an external wall, and another from an internal wall for inspection.

 
Hokie66,

No worries. We’ve have a lot of comments on this thread.

The screws are backing out, not in. I have not examined the screws yet but plan to look at them.

The black line is not a membrane, it’s definitely the veneer separating from the mortar. It jumps at the corner which is the tell.

The house is brand new and under air. As for the doors and windows, not sure on that one. This was the first house on the street to be built, followed by the immediately adjacent lots. Due to the amount of construction surrounding the lot, I’d expect the homeowner would keep everything buttoned up for noise reasons.

I requested the construction schedule from the builder so I can see when framing was completed, roof installed, dried in, then drywall hanging. Then I can check the almanac for weather conditions. I’m suspecting it was super moist when they framed and dried in. Then hung drywall prematurely on a schedule crunch before the framing reached an equilibrium for moisture content.

As OG said, I want this done right because they attempted repairs once before and it all came back. So whatever the engineering fix is, has to solve the issue.

Erica
Structural and Geotechnical Engineer (yes I know this isn’t a typical combo)
 
Status
Not open for further replies.

Part and Inventory Search

Sponsor