EDB9
Structural
- May 17, 2019
- 63
Hello,
I am working with a warranty department for a major home builder. A residence that took occupancy last year is a large three story residence with a slab on grade and turndowns around the perimeter. The lot was a cut lot and the slab bears fully on residual soil. We had no involvement with the initial site testing and I have a one pager that says it’s good. Well I’m questioning that entirely because the house has thousands of nail pops, drywall separations, molding separations, and they increase in numbers daily. A brand new house should not do this! Across the street is another development being cleared and grubbed immediately adjacent, and goes for probably about a mile. I had HABs conducted and found extremely soft blow counts, from 1 to 4 on the front left side but as you went to the rear left side, the counts were mostly acceptable >8. Lab testing indicated mostly ML, MH, and SM. All samples were damp or wet with no groundwater table found at 10’. Organics are present in some samples that haven’t been tested yet. It has been a rather wetter season lately so I suspect that’s why the moisture is retaining. I am at a loss of what could truly be causing this. There was information on the subdivision geotech report stating two lots over was a large organics pit that required soil remediation, but that was a fill lot anyways. I did a quick perimeter check to see if I could see any drainage issues or cracks in the slab but it was pouring rain so it was a rushed effort and I was sans umbrella. I couldn’t see the interior slab because of the floor coverings but I would have expected to see something somewhere in the floor tiles if there was differential settlement occurring. Only in the vertically mounted tiles did I see any separation.
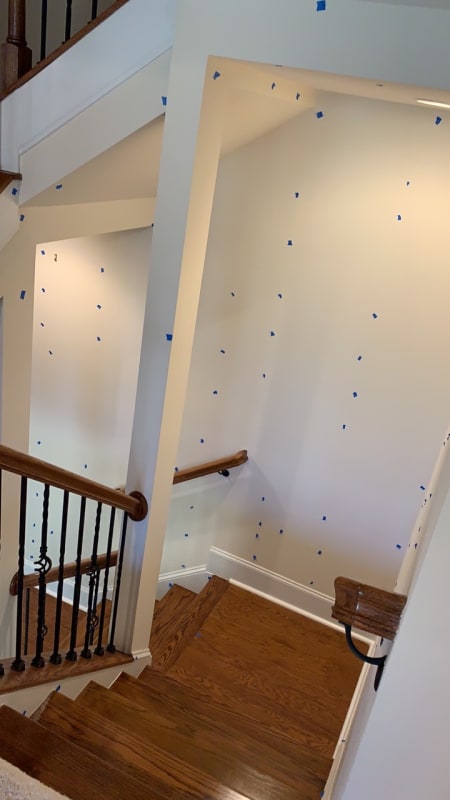
Here is a sample picture of the stairs to the next floor up. The blue painters tape are where the homeowner has marked all the spots that have pops, pulls, separations, etc. The landing in the photo is one of two bouncy areas with excessive deflection.

The warranty department made repairs once already this past winter and within a week they all started coming back! So they stopped all repairs until we can fix the source of the issue causing the distress.
Here’s the big question. How do I fix this? I really don’t want to have to bring a drill out and do SPTs but if that’s the only option, then that’s gonna have to be what happens.
Has anyone ever experienced issues like this? If so, what was the issue and fix?
I am working with a warranty department for a major home builder. A residence that took occupancy last year is a large three story residence with a slab on grade and turndowns around the perimeter. The lot was a cut lot and the slab bears fully on residual soil. We had no involvement with the initial site testing and I have a one pager that says it’s good. Well I’m questioning that entirely because the house has thousands of nail pops, drywall separations, molding separations, and they increase in numbers daily. A brand new house should not do this! Across the street is another development being cleared and grubbed immediately adjacent, and goes for probably about a mile. I had HABs conducted and found extremely soft blow counts, from 1 to 4 on the front left side but as you went to the rear left side, the counts were mostly acceptable >8. Lab testing indicated mostly ML, MH, and SM. All samples were damp or wet with no groundwater table found at 10’. Organics are present in some samples that haven’t been tested yet. It has been a rather wetter season lately so I suspect that’s why the moisture is retaining. I am at a loss of what could truly be causing this. There was information on the subdivision geotech report stating two lots over was a large organics pit that required soil remediation, but that was a fill lot anyways. I did a quick perimeter check to see if I could see any drainage issues or cracks in the slab but it was pouring rain so it was a rushed effort and I was sans umbrella. I couldn’t see the interior slab because of the floor coverings but I would have expected to see something somewhere in the floor tiles if there was differential settlement occurring. Only in the vertically mounted tiles did I see any separation.
Here is a sample picture of the stairs to the next floor up. The blue painters tape are where the homeowner has marked all the spots that have pops, pulls, separations, etc. The landing in the photo is one of two bouncy areas with excessive deflection.

The warranty department made repairs once already this past winter and within a week they all started coming back! So they stopped all repairs until we can fix the source of the issue causing the distress.
Here’s the big question. How do I fix this? I really don’t want to have to bring a drill out and do SPTs but if that’s the only option, then that’s gonna have to be what happens.
Has anyone ever experienced issues like this? If so, what was the issue and fix?
