Continue to Site

Eng-Tips is the largest engineering community on the Internet

Intelligent Work Forums for Engineering Professionals

  • Congratulations KootK on being selected by the Eng-Tips community for having the most helpful posts in the forums last week. Way to Go!

Attractive Drawings 5

Status
Not open for further replies.

drawoh

Mechanical
Oct 1, 2002
8,878
I am reviewing drawings here and I am being a bit of an asshole. We are a manufacturing service company and all of our drawings may be shown to the customer. In addition to being clear, we need them to look good and professional.

I am asking for well organized drawings with consistent fonts, with dimensions, notes, section lines and whatever positioned to be clearly visible. I don't want dimensions line crammed together such that I cannot see which dimension and which feature they apply to.

Is there a good article or other reference on this? Do I need to sit down and write one?

--
JHG
 
Replies continue below

Recommended for you

From Machinery's Handbook


Checking Dimensions:
Check all dimensions to see that they are correct. Scale all dimensions
and see that the drawing is to scale. See that the dimensions on the drawing agree with
the dimensions scaled from the lay-out. Wherever any dimension is out of scale, see that
the dimension is so marked. Investigate any case where the dimension, the scale of the
drawing, and the scale of the lay-out do not agree. All dimensions not to scale must be
underlined on the tracing. In checking dimensions, note particularly the following points:
See that all figures are correctly formed and that they will print clearly, so that the workers
can easily read them correctly.
See that the overall dimensions are given.
See that all witness lines go to the correct part of the drawing.
See that all arrow points go to the correct witness lines.
See that proper allowance is made for all fits.
See that the tolerances are correctly given where necessary.
See that all dimensions given agree with the corresponding dimensions of adjacent parts.
Be sure that the dimensions given on a drawing are those that the machinist will use, and
that the worker will not be obliged to do addition or subtraction to obtain the necessary
measurements for machining or checking his work.
Avoid strings of dimensions where errors can accumulate. It is generally better to give a
number of dimensions from the same reference surface or center line.
When holes are to be located by boring on a horizontal spindle boring machine or other
similar machine, give dimensions to centers of bored holes in rectangular coordinates and
from the center lines of the first hole to be bored, so that the operator will not be obliged to
add measurements or transfer gages.
 
And one more from the same source

Method of Making Drawing:
Inspect the drawing to see that the projections and sections
are made in such a way as to show most clearly the form of the piece and the work to be
done on it. Make sure that any worker looking at the drawing will understand what the
shape of the piece is and how it is to be molded or machined. Make sure that the delineation
is correct in every particular, and that the information conveyed by the drawing as to the
form of the piece is complete.


The book also has specifics for (what to look for when checking) assemblies, castings, machined parts, etc.
 
Hire a checker.

When my company had a checker the drawings were consistent.

When all the checkers were laid off, they stopped being consistent.
 
Why should checkers be consistent?

"For every expert there is an equal and opposite expert"
Arthur C. Clarke Profiles of the future

 
The problem I see these days, with CAD being less expensive than it used to be, companies hire people and give them CAD. No proper training in the software or standard drafting practices. Anyone is doing drawings. This makes crappy drawings. I have had managers tell me that it shouldn't be an issue, it's in CAD and CNC.
I'm counting the days until retirement...7 more years. lol

Chris, CSWP
SolidWorks
ctophers home
 
Because -a- checker is lazy. They want uniformity to make their own job easier and they will erode down to only one opinion. On any project at most we had two checkers, and they had worked together for so long it didn't matter much.

After our checkers were gone management expected the 50 or so engineers to stay after work hours and make teams to decide how to make consistent drawings. That did not happen.
 
Additionally - because of ISO 9000 efforts, the QA department destroyed the majority of company standards that drove drawing notes. Can't be out of compliance if there is no standard to comply with. Guess who got bonuses for successfully lying to the ISO reviewer? Shittier product with the ISO stamp of approval.
 

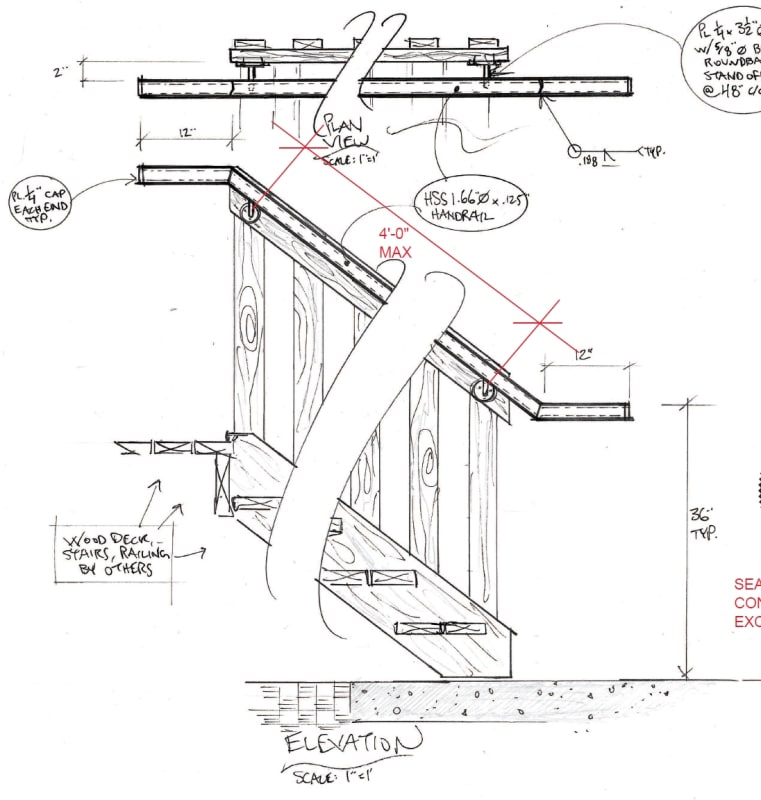
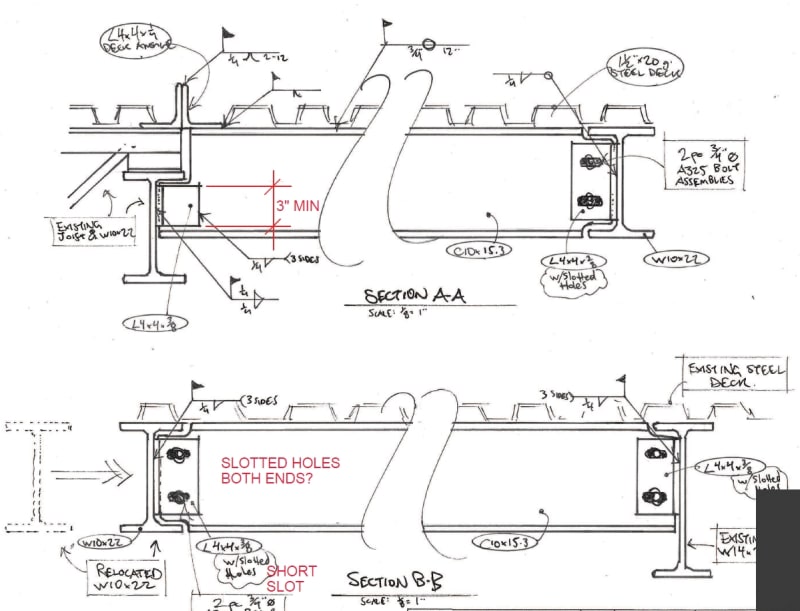
I concur... most people don't see engineers except for their products. When I was younger, it was impressed on us that documents had to be excellent in appearance (as well as being correct) because it the one thing people generally see about a consultant. One of my clients prepares miscellaneous metal products (metal fabrication) using hand drawn 'drawings', not CAD. His drawings are a work of art, and could almost be framed and hung on a wall.

-----*****-----
So strange to see the singularity approaching while the entire planet is rapidly turning into a hellscape. -John Coates

-Dik
 
List of standards:
ASME Y14.1, Drawing Sheet Size and Format
ASME Y14.1M, Metric Drawing Sheet Size and Format
ASME Y14.2, Line Conventions and Lettering
ASME Y14.3, Orthographic and Pictorial Views
ASME Y14.5, Dimensioning and Tolerancing
ASME Y14.24, Types and Applications of Engineering Drawings
ASME Y14.34, Associated Lists
ASME Y14.35M, Drawing Revisions
ASME Y14.36M, Surface Texture Symbols
ASME Y14.38, Abbreviations and Acronyms
ASME Y14.41, Digital Product Definition Data Practices
ASME Y14.100, Engineering Drawing Practices

If your drawings are created against these standards, then they will have a uniform appearance.

"Wildfires are dangerous, hard to control, and economically catastrophic."

Ben Loosli
 
I guess I couldn't get out of "Friday mood", wanted to add "in the Twilight Zone" to looslib's post.

Unfortunately with current state of affairs, 90 % of the list are considered fulfilled by installing "out of the box" configuration of CAD system.

Ctopher, 1 less year. Cannot wait.

"For every expert there is an equal and opposite expert"
Arthur C. Clarke Profiles of the future

 
I'm an old drafter. Started using CAD before it was called CAD, late 70s. Back in the day companies used technicians who specialized. Over time and with much encouragement from the software companies, document production has been left to the engineer/architect/professional. Usually left to the younger members of that group, those folks don't usually spend the time to become expert with the software.
I am asking for well organized drawings with consistent fonts, with dimensions, notes, section lines and whatever positioned to be clearly visible. I don't want dimensions line crammed together such that I cannot see which dimension and which feature they apply to.
Yes, you should expect, even demand that.
 
+1 on having a dedicated checker(s).

I would also strongly encourage the use of known good drawings as informal templates. My first employer had a huge manual of drafting standards bc as a huge, century-old manufacturer they wanted consistency down to the grid location for many dims/details. As a junior engineer that very rarely needed to do my own drafting, my default was to pull a similar print and copy as much as possible.
 
I think having a dedicated checker is 'a thing of the past' at most places.

-----*****-----
So strange to see the singularity approaching while the entire planet is rapidly turning into a hellscape. -John Coates

-Dik
 
Can someone post here an example or an excerpt from an "attractive drawing"?
 
Dik, much like most editors and fact checkers have been eliminated from written publications.

It makes a weird management sense - instead of using computers to create better designs with the productivity increase, use them as an excuse to berate engineers and hold back pay raises for not being suitably consistent with all the other engineers and for their drawings not being suitably "pretty."

Not only is there savings in not paying for a review of suitability and ease to understand the item the drawing represents, a first pass before manufacturing/outsource bidding has to look at it, there is also the leverage of putting down "POOR - needs improvement" on what is often a subjective standard when considering a pay increase. You could cripple an engineer that designs $1Million in annual profit items and put them on a "recovery" path out the door rather than spend the $5k to redline the drawings.

---

Most parametric CAD has auto-place dimensioning once the views are decided on. I prefer the one-feature-at-a-time method along with a trimetric view to catch any stragglers that I didn't have a suitable projection for. There is usually auto-space as well to set the dimensions at even intervals. Line and text fonts are controlled by preferences so no need to do that more than once. Copy/paste standard notes or make a giant note block to place and delete all the unwanted entries. Which views and sections to use is usually design dependent, so not much to standardize on that, unless it's plate and cut structural shapes.

It sounds like drawoh has volunteered to be the new checker. Congrats on the new position that is just part of the new expectations for job responsibilities.
 
3DD... concur... my dad always used to say, "There's an elegance in precision."

-----*****-----
So strange to see the singularity approaching while the entire planet is rapidly turning into a hellscape. -John Coates

-Dik
 

There are much better and more intricate drawings than these, and more artistic... next time one pops up, I'll record it... but you get the drift. The red comments are mine...

Clipboard01_vlbpy1.jpg


Clipboard02_sqhzrm.jpg


-----*****-----
So strange to see the singularity approaching while the entire planet is rapidly turning into a hellscape. -John Coates

-Dik
 
Burunduk said:
Can someone post here an example or an excerpt from an "attractive drawing"?

Burunduk,
Please, don't ask and let this discussion be filled with indecency. This should be (and it is so far) a professional thread. Keep it like that.
 
Status
Not open for further replies.

Part and Inventory Search

Sponsor