Continue to Site

Eng-Tips is the largest engineering community on the Internet

Intelligent Work Forums for Engineering Professionals

  • Congratulations KootK on being selected by the Eng-Tips community for having the most helpful posts in the forums last week. Way to Go!

Can you skip a projected view on a drawing? 4

Status
Not open for further replies.

Diametrix

Aerospace
Jan 31, 2023
50
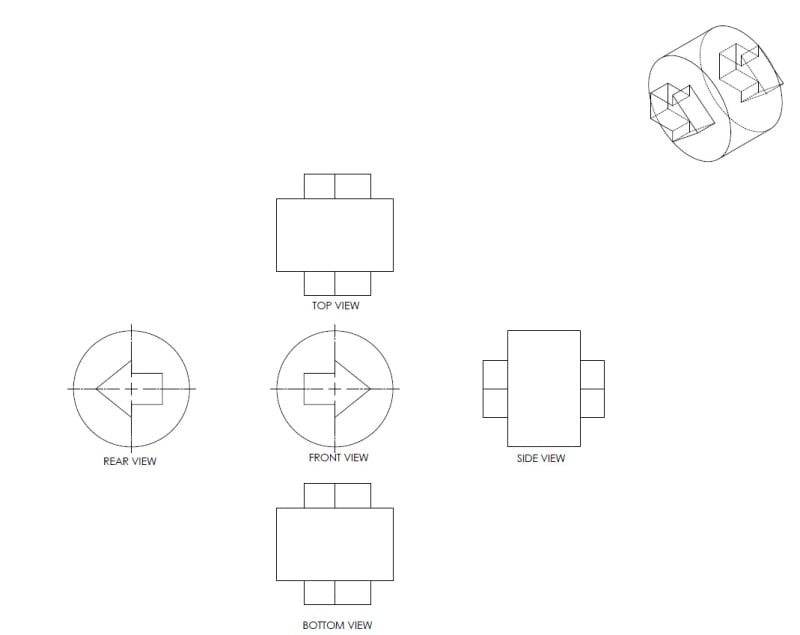
I ran across a drawing where the engineer had front, top and bottom views on the drawing but then next view to the side was the rear view. The justification was that the side view was "skipped". There was not really any room left on the sheet to put it above or below. I couldn't find anything in Y14.3 that would expressly forbid such practice. It just looked really strange to me. Does the standard allow that?
 
Replies continue below

Recommended for you

I don't know, but the common practice for non-projected views is to add view arrows to the correct primary view.
 
That was my suggestion as well, to use a removed view. However the question was raised if it was ok to leave it as is. Technically it is a projected view, it is just not in a "standard" sequence.
 
I guess it depends if the projected view was necessary. I never knew it was essential to provide all views.

-----*****-----
So strange to see the singularity approaching while the entire planet is rapidly turning into a hellscape. -John Coates

-Dik
 
Projection is from the neighboring view, not from some view separated. Presuming this is a 3D modeler, the user didn't use the projected view function to create it.
 
dik said:
I never knew it was essential to provide all views
Correct. The standard says: "The minimum number of views necessary to describe the part is shown" Does it mean that you can skip projected vies that are suppose to go between two other views though?
 
3DDave said:
Projection is from the neighboring view, not from some view separated
If you mean this in terms of a CAD then it depends on the software. For example, in SW I can make a projected rear view from a side view and then delete the side view and the rear view is still going to be there. According to standard though, projected views are created from the object not from another view.
 
I have seen many drawings this way. The back view is shown next to the front view, but flipped. If the machinist isn't paying attention to the view, it could be made backward. I have seen this. I always show the projected views.

Chris, CSWP
SolidWorks
ctophers home
 
Ah - Solidworks - always allowing the user to do the wrong thing.

After you delete the intermediate view if you move the original does the projected view remain projected? Does it move to maintain alignment or not? If not, then it isn't a projection.
 
3DDave said:
After you delete the intermediate view if you move the original does the projected view remain projected? Does it move to maintain alignment or not? If not, then it isn't a projection.
No. The projected view stays, but technically no longer aligned, or projected.

Chris, CSWP
SolidWorks
ctophers home
 
3DDave said:
Does it move to maintain alignment or not?
Like you said, there is a hack in SW to do just about anything. You can break alignment to the parent view, in this case the side view and create new alignment to the front view. Then it will move and maintain alignment with the front view.
 
This is very poor practice. The projection systems are based on a 90°rotation between views, and omitting views pretty much negates the scheme.

"Know the rules well, so you can break them effectively."
-Dalai Lama XIV
 
ewh said:
This is very poor practice
No argument from me here. I was just trying to see if there is anything in any of the standards that expressly prohibits it.

All I could find so far in Y14.3 is:

7.4 Two adjacent orthographic views are normally considered the minimum requirement to describe a three-dimensional object.
7.6 Any three adjacent views that best suit the shape of the part may be employed
3.1 adjacent views: two adjoining orthographic views aligned by projectors

It certainly seems to imply it but doesn't go as far as stating it
 
Your rear view has no definition of its orientation until you define and relate it to other primary view(s).

Best regards,

Alex
 
I guess you got us. There's no reason not to. Call the committee and ask them to idiot proof the standard.
 
jassco said:
Your rear view has no definition of its orientation
Not really. In my example it is still to the left of the front view, so you know which way the projection goes. You are just missing the adjacent side view that should be between those two.

Like this:

Rear_View_gx6qxs.jpg
 
The views are labeled and don't depend on projection, so they aren't considered projected views. They could all be randomly located on the drawing. Labeling views is also not typical and not standardized.

Now tell us how to know that the "up" direction in the "rear" view is the same as in the "front" view. That has to be assumed as it is a labeled view and not a projection.
 
Drawings should be clear the first time looking at them. If there is a moment you have to think about what you're looking at, something missing or wrong.
In the drawing from Diametrix, the left side view is missing. The rear view is not projected.

Chris, CSWP
SolidWorks
ctophers home
 
3DDave said:
The views are labeled and don't depend on projection, so they aren't considered projected views.
And that's based on what? That's taking it a step further than the standard intended. Y14.3 says: "6 PRINCIPAL ORTHOGRAPHIC VIEWS: The terms "top,"front," "bottom," "right side," "left side," and "rear" shall themselves not be used for naming views." It doesn't say the views can't be named or that naming a view automatically makes it a removed orthographic view. There are specific rules for identifying a removed orthographic view, not to mention the other named views.
 
Status
Not open for further replies.

Part and Inventory Search

Sponsor