Continue to Site

Eng-Tips is the largest engineering community on the Internet

Intelligent Work Forums for Engineering Professionals

  • Congratulations KootK on being selected by the Eng-Tips community for having the most helpful posts in the forums last week. Way to Go!

Control Joint Material— Basement Wall

Status
Not open for further replies.

GreatDane2022

Structural
May 16, 2021
28
What is the go-to material to create a control joint in a basement wall (will be thoroughly waterproofed and water table not an issue)?

I thought drip edge flashing on soil side (doing reveal/chamfer on open side) but 90-degree flashing appears to be unavailable. It’s a 12-inch wall and I was going to do 1.5x 1.5” drip flashing on dirt side.

Any suggestions for easier way and/or readily available material?

 
Replies continue below

Recommended for you

Can you clarify: are you looking to flash the top of the wall from the exterior wall above, or are you looking to do a vertical control join in the wall?
 
Sorry…I was kind of vague…vertical control joints. I was planning on attaching the flashing vertically (one leg of 90-degree flashing to form and other leg protrude into concrete by 1-1/2”). Directly across the wall, I have a 1-1/2” vertical reveal. So 1.5” on each side of wall creating the textbook “25% of wall width” control joint. 😂 Joints every 20 feet on 200 LF wall.
 
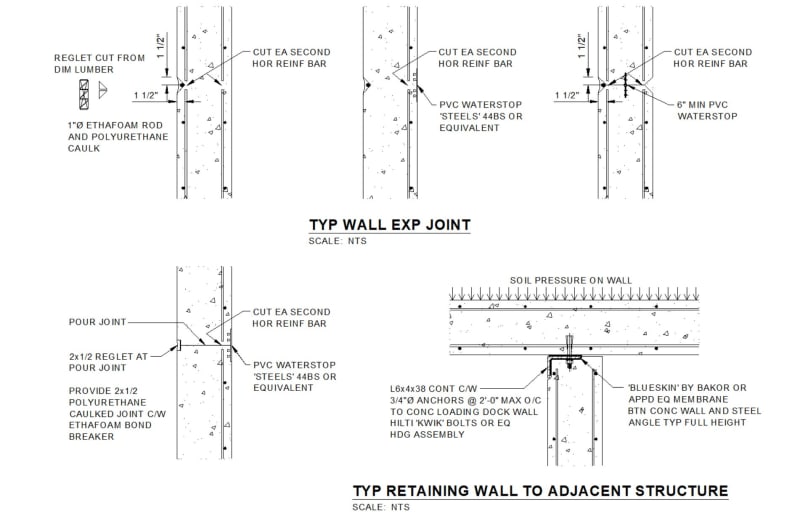
I generally use a keyway, with the rebar going through and a bentonite rod in the keyway for a waterstop. If you need a real joint for movement, then sm0oth dowels anchored on one side, a proper reglet and ethafoam rod with a properly designed elastomeric caulk. Something like: [pipe]

Clipboard01_yiyadk.jpg


So strange to see the singularity approaching while the entire planet is rapidly turning into a hellscape. -John Coates

-Dik
 
I think we have a different understanding of a "control" joint. Control joints are used to control cracking and creating one does not involve "installing" anything. They are quite different from expansion joints and construction joints. Its just a joint that is either troweled in or sawcut in. There is nothing different about the waterproofing at a control joint.....just waterproof right over it. Incidentally, I typically see them on the inside face of the wall as opposed to the outside. That way, the joint can be sawed without having to coordinate the timing of the waterproofing and backfilling.
 
Thank you dik and MotorCity.

The detail dik provided helps. This is a control joint (force cracking at predefined location for aesthetics). I would not be able to trowel in because it is on the vertical face of the wall where form is. Do people saw it on vertical wall faces? I haven’t seen that but there’s a lot of stuff I haven’t seen. Seems easier to create a weakened section in wall by adding ‘some material’ to the form and then popping it out during the stripping of forms. I think I am going to attach 1x2 on the small side to the form and the flank with 3/4 chamfer.

 
Status
Not open for further replies.

Part and Inventory Search

Sponsor