Continue to Site

Eng-Tips is the largest engineering community on the Internet

Intelligent Work Forums for Engineering Professionals

  • Congratulations KootK on being selected by the Eng-Tips community for having the most helpful posts in the forums last week. Way to Go!

In-flight breakup Yellowhead Helicopters Ltd. Bell Textron Inc. 212 (helicopter), C-GYHQ 7

Status
Not open for further replies.

hpaircraft

Member
Mar 23, 2018
106
Not necessarily an engineering failure (except maybe process engineering), but one that should be of interest to any aero or mechanical engineer.


Long story short: Bell Helicopter subcontractor should have made blade retention pins from H11 tool steel hardened to Rockwell C 53, actually made them from 316 stainless of Rockwell C 8.

How one of these pins actually made it into a flying helicopter, and how all the opportunities to prevent it were missed, is fascinating.
 
Replies continue below

Recommended for you

It is a horrifying read but at the same time, nothing that I haven't seen or heard of before, although normally not quite on the scale of guaranteed hull loss on a single failure. I am surprised that Bell sub's out such fight critical items.

What was John Hart Smiths line about subcontracting out profits while leaving ones self with the liability. Its a pity there isn't a financial analysis to "aid" companies in having a better understanding of the financial risk associated with poor risk management which is what this looks like. This appears to have bad staffing practices, poor processes, possible under-investment in equipment.
 
Lack of oversight by Bell? Likely the supplier offered the least costly item. [ponder]

So strange to see the singularity approaching while the entire planet is rapidly turning into a hellscape. -John Coates

-Dik
 
[URL unfurl="true" said:
https://www.prnewswire.com/news-releases/p4g-capital-announces-investment-in-fore-machine-and-aero-components-300469825.html[/URL]]FORT WORTH, Texas, June 6, 2017 /PRNewswire/ -- P4G Capital Partners ("P4G Capital") announced today that it has acquired the assets of Fore Machine Company, Inc.

[URL unfurl="true" said:
https://www.tsb.gc.ca/eng/rapports-reports/aviation/2021/a21w0045/a21w0045.html[/URL]]Bell’s last audit of FMC before the occurrence pins were manufactured (in 2018) was completed on 17 August 2017 ...

FMC’s quality control department used helpers to assist the quality control inspector during times of high workload ...

It sounds like a lack of appreciation for process/audit controls.

[URL unfurl="true" said:
https://petition.substack.com/p/foremachinellc[/URL]]New Chapter 11 Bankruptcy Filing - Fore Machine LLC ... filed for chapter 11 bankruptcy on March 7, 2022 in the Northern District of Texas
 
—-The thermal treatment contractor, Bodycote, is looking fairly prescient here: this “smoking gun” photo with a box of 43-shining 316 pins, all scribed with a neat yellow line! —Have a nice day!

— Sounds as if no one at FMC had a GED, since they couldn’t calculate how much stuff they needed: the report says they order for 350 pins, but determined it’s only good for 320 pins, but lo and behold, they only made 300! Excluding the 43 pins of mystery metal.
 
Even the machinists, both for the roughing and post HT grinding, probably noticed a difference between the pins. 300 stainless steels make quite a different chip and leave quite a different surface profile during lathe turning. I don't know enough about grinding to speculate but I assume there are similar differences.
 
Thank you for bringing this investigation report to my attention.
I've held these parts in my own hands and of course wouldn't have known a 316 pin from a H11 pin once it was finished and part marked.
But so many missed opportunities in the manufacturing process when it would have been obvious...
This report will be valuable as a teaching aid when I am advising my colleagues about materials, processes, and quality control. Details matter.

I get the sense that there was a verbal exchange from Bodycote to FMC about those pins. With no satisfaction a smart Bodycote engineer or manager took a picture and held on to it.
Even if the FMC guys didn't know what they were doing, the Bodycote people probably did.

Here is the Bell Helicopters response in an Alert Service Bulletin:
Compliance was mandatory before the next flight, effectively grounding all 212's in the world until inspected.
 
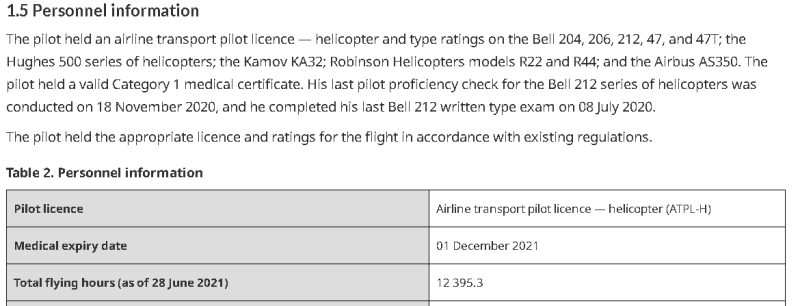
This was a tragedy in my neck of the woods. I really hope that this goes down as learning example at colleges and universities, because it sure took a toll on the community. Check out the variety of type ratings and the pilot's hours. He was no spring chicken.
Screenshot_2022-10-05_082438_iaqpdq.png
 
Sparweb said:
Thank you for bringing this investigation report to my attention.
I've held these parts in my own hands and of course wouldn't have known a 316 pin from a H11 pin once it was finished and part marked.

I designed a part where I specified STAINLESS STEEL 416, and I noted that the material is magnetic. In my case, I actually was interested in thermal expansion coefficient. 416 is quite different from 300[ ]series.

I am setting up design and drafting standards at my new job. I am figuring that I specify ALUMINIUM[ ]7075[‑]T6 or STEEL[ ]4130 for some reason, I will specify the Vickers hardness. If you specify anything, you need to be able to inspect for it.

--
JHG
 
This case is all of sad, pathetic and maddening.

My summary (with approximate numbers for easification): To meet an order for 300 parts, FMC set out to run 350. They ordered enough stock for roughly 320 parts (8 rods x 40 parts/rod) and buffered the run by including an additional rod of "stock". FMC's heat treat sub identifies 40 parts as nonconforming when completing their contract. FMC brings the identified nonconforming parts back into the production run and declares them good.

Of the nonconforming parts that continued through the production run, most failed at other stages and were rejected anyway. 12 made it through and one resulted in a fatality.

[URL unfurl="true" said:
https://www.tsb.gc.ca/eng/rapports-reports/aviation/2021/a21w0045/a21w0045.html[/URL]]... this was the first time FMC was manufacturing main rotor hub strap retaining pins for Bell

... FMC personnel recorded a hardness value of 50.5 on the Rockwell C scale for pin serial number FNFS90. However, testing of the same pin at the TSB Engineering Laboratory determined that it had an actual average hardness of 7.6 on the Rockwell C scale.
 
The 300 series stainless steel can become magnetic during cold working. Not as magnetic as 416 but I wouldn't use that as a quality check, especially for smaller parts.
 
Sym,

Looks pretty accurate except that they could not find any paper trail to say how the bar of 316 got there.

Also why when they received back the parts in two separate boxes, one marked Ok, the other marked HOLD they seem to have mixed them all up again.

Maybe bodycote shouldn't have sent them back, it's difficult to assign individual blame, but is a shocking lapse of QA / QC by FMC.

Remember - More details = better answers
Also: If you get a response it's polite to respond to it.
 
I was offering an explanation of how the 316 was introduced by simplifying the numbers. It looks to me like an additional bar of stock was introduced to buffer the run, even though, and in the end, it may not have been needed.

Bodycote did not own the parts and rightfully and responsibly returned the parts with the suspect parts identified and separated. FMC's behavior after that is bizarre to be generous, unless they genuinely believed the parts were o.k., but that's a stretch. If FMC wanted to follow up on Bodycote's testing, they would have their most qualified and experienced technician sample a few of the suspect parts and take it from there. Retesting all of the parts was not a rational response to the problem and the outcome confirms that.

TugboatEng (Marine/Ocean) 5 Oct 22 17:31 said:
I wouldn't use that as a quality check

My understanding is that in this instance, the tests became a waving red flag to the underlying stock issue rather than a typical q.c. marker.
 
I made that comment about the machinists as well. They shouldn't be a quality check either but with such widely different material properties many people had to have noticed something was different. I imagine they had some difficulty maintaining tolerance between pins if they were of different materials.
 
Possibly a work environment factor where subordinates are discouraged from engaging in constructive feedback circuits.
 
Tug,

Cylindrical parts from cylindrical stock.

The machine advances the rod after each part is cut off. It likely loads a new rod by itself as well.

Push the button and go do something else. No machinist to look at chips.
 
Their work flow was interesting, and the reason I approximated 40 pieces per rod.

[URL unfurl="true" said:
https://www.tsb.gc.ca/eng/rapports-reports/aviation/2021/a21w0045/a21w0045.html[/URL]]From 12 to 14 November 2018, the rods of raw material, which varied in length from 132 to 156 inches, were cut up into 36-inch lengths and then further cut into 3.3-inch lengths. The resulting 343 pieces would ultimately become the main rotor hub strap retaining pins.

They're scrapping three or four potential pieces for every rod of stock they touch.
 
Yesterday I read the report and I admit it got me a little agitated. "This isn't supposed to happen".

For a bit of background on the operations that should happen in a properly controlled aerospace manufacturer, all stock should be identified in a way that all employees can readily identify. It really shouldn't matter if the stock looks similar or is stored on the same shelf (although these factors can be used to encourage segregation). All stock that I've handled in the various aerospace companies has had a system to identify and track materials and to not lose track of anything. There are plenty of ways to unmistakeably identify a stock material, the most popular are bar-codes or QR codes linked to a computer, but before that a unique tracking number on a sticky label worked well. The simpler the system you use, the more rigorous your training has to be, so most manufacturers opted for something much more foolproof than handwritten stickers. The higher the criticality of parts should also drive the rigor of the material tracking process. The only time stock material tracking might slacken is when it's set aside as scrap, but then it stays in a quarantine area never again to pass through the shop door.

With that in mind, any employee of FMC, either a QC specialist or a "helper" should have had at least one way, and probably more than one, to identify each piece of round bar being taken out of stock and assigned to the work order. Even though this first line of defense broke down, there were many more opportunities to identify the problem afterward.

I don't feel the incorrect hardness test result is adequately explained by the investigation report. The investigators didn't flag the inadequate records, which, if they had been prepared properly by FMC, would have shown the shortcoming of these parts. Instead the investigators flagged the lack of training for personnel doing the tests - which I agree with - but lets the system get away with no checks to show that it was done properly afterward.
 
Mint, the long chips formed machining 300 series SS generate a lot of heat. The 300 SS also has a high thermal expansion coefficient. Running the machine along the length of the pin with the same program for the tool would likely result in significant taper along the length.

For the harness tests, can HRC produce a reliable or comparable reading at 7?
 
Sparweb - yeah, I agree. The material handling system was completely atrocious.

The problem is that supply chain oversight has gotten worse and worse with OEM corporate cost cutting.
 
Status
Not open for further replies.

Part and Inventory Search

Sponsor