Eng-Tips is the largest engineering community on the Internet

Intelligent Work Forums for Engineering Professionals

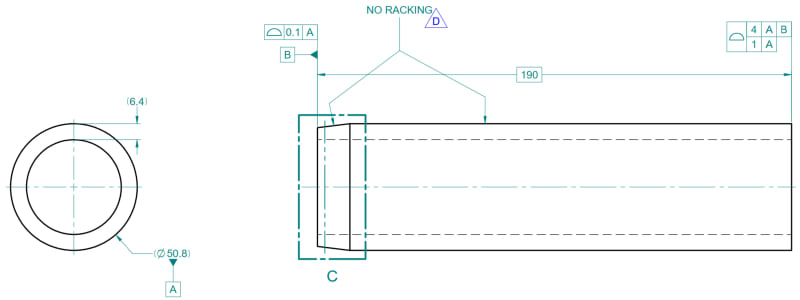
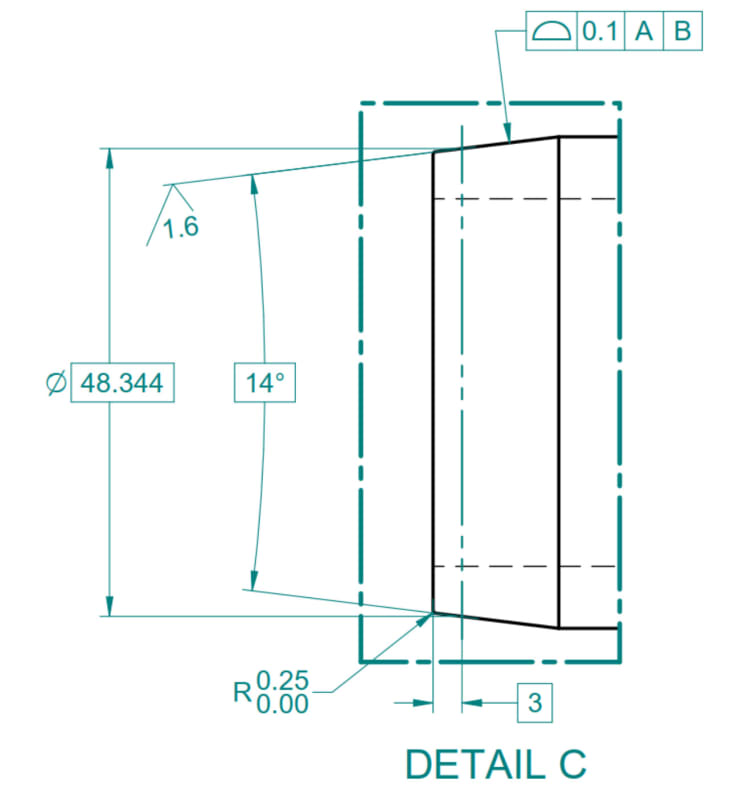
Is this the right way to measure the profile ? 3

Status
Not open for further replies.

SeasonLee

Mechanical
Sep 15, 2008
909
0
0
TW
Please ref to the attached fig and video, is this the right way to measure the profile as shown on the video?

2024-04-16_231443_telur8.jpg


2024-04-16_231604_ewcjcp.jpg


Please advise the correct way to measure the profile if the video is wrong
Thanks for your help in advance.

Season
 
Replies continue below

Recommended for you

Yes, rotated in a V-block.

This is the method used by the inspector in our QA Lab. I think this may be a bit wrong because the indicator is not perpendicular to the surface.

Season
 
How is the gauging diameter established with the set-up and how are out-of-round variations in the datum feature diameter eliminated as sources of variation, including those which tend to cancel actual profile deviations as measured with this setup?

The perpendicularity error may be calculated as a cosine error, or 2% less if the indicator is 10 degrees off perpendicular.
 
RE 3DDave's question, your Datum A has a size specification but it's form control is not refined beyond the limits of its size tolerance. Its variation will affect the measured variation of profile of the tapered surface. The profile of your Datum A has to be measured and subtracted from the reading obtain while measuring the taper. A dial indicator has to be set simultaneously on Datum A during the rotation.

I just relooked at the video - your Datum A appears to be stock finish, this may complicate or invalidate my suggestion of using a simultaneous indicator setup.
 
I think technically you'd have to have a collet that is almost 190mm long in order to accurately grab the entire virtual condition OD. Then you can run the indicator on the tapered surface. Depending on the fit and function of the part it may be more practical to use diametral datum zones or bands rather than the entire OD. Also, the profile callouts on the ends do not seem to make sense. The one on the left needs a secondary datum reference to lock down the translation before you can check profile. They should have just used Perpendicularity here. The one on the right just doesn't seem to make sense period. If I'm wrong somebody please let me know.
 
The one on the right is OK. It uses the profile tolerance to create zone for the feature and has a refinement to control perpendicularity.
 
3DDave said:
How is the gauging diameter established with the set-up and how are out-of-round variations in the datum feature diameter eliminated as sources of variation, including those which tend to cancel actual profile deviations as measured with this setup?

We almost ignored this basic information, thank you very much for your questions. But I know the gage diameter found out of specification by 0.035mm.

3DDave said:
The perpendicularity error may be calculated as a cosine error, or 2% less if the indicator is 10 degrees off perpendicular.

The cosine error will be calculated with 7°(half of the taper angle 14°) or by 14° which is used by our inspector?

Brian Malone said:
your Datum A appears to be stock finish, this may complicate or invalidate my suggestion of using a simultaneous indicator setup.

You are absolutely right, you got the point. Edit: We must make a change on datum A set up.

Eric Gushiken said:
I think technically you'd have to have a collet that is almost 190mm long in order to accurately grab the entire virtual condition OD.

Good suggestion, will try.

Eric Gushiken said:
The one on the left needs a secondary datum reference to lock down the translation before you can check profile.

There is a similar example in Figure 11-20(2018 version).

Thanks for all of your comments

Season
 
The dial indicator is not moving axially. How is this going to ensure that the actual cone angle is not off by more than the specified profile tolerance allows?
 
Though I see no evidence of it, conceivably they could set the zero for the dial indicator for each axial location, making a series of circular steps along the cone rather than making linear sweeps.

Is it likely they were doing that? Nope.I have no idea what the plan for this was.
 
pmarc said:
The dial indicator is not moving axially. How is this going to ensure that the actual cone angle is not off by more than the specified profile tolerance allows?

I think the best way is to make the inclined edge of the cone to be parallel to the surface plate, this can be done with the using of a sine plate. In this case, the dial indicator will be easily controlled on its movement.

Season
 
On a sine plate there is difficulty determining the gauging diameter setback. It needs to come back 3mm parallel to the datum feature simulator for datum feature B that is profile (perpendicular) to A. With that required as the initial setup, that is parallel to the axis of datum feature A, resetting it to an angle makes that determination difficult.
 
3DDave said:
Though I see no evidence of it, conceivably they could set the zero for the dial indicator for each axial location, making a series of circular steps along the cone rather than making linear sweeps.

Would this still allow to detect any cone angle error?
 
Burunduk said:
Is there a chance they could project the cone at the modified setup (with solution for a stable datum A) on an optical comparator?

Thanks for the suggestion, we can try it later.
Thanks

Season
 
Status
Not open for further replies.
Back
Top