Continue to Site

Eng-Tips is the largest engineering community on the Internet

Intelligent Work Forums for Engineering Professionals

  • Congratulations KootK on being selected by the Eng-Tips community for having the most helpful posts in the forums last week. Way to Go!

Please what's the exactly meaning in the Annotaion note of drawing?

Runsong Lin

Structural
Nov 18, 2024
3
Hi everybody,
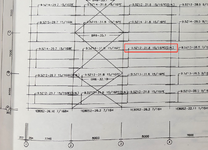
As below image, here is a typical steel design drawing. But some annotation notes weren't be understood clearly. In fact, I hope to know what is exactlty meaning about "9.5Z12-31.8 15/16PE(D.N.)" ? Could you please give some advice or recommend some relative specification? Thank you in advance!
11.png
 
Replies continue below

Recommended for you

Please don't double post.

The 9.5 is the depth, the "Z" is the shape. The 12 is gauge of steel used. Not sure on the rest though.
 
Last edited:
9.5Z12 is a "Z" shape 9 1/2" tall made from 12 gauge material
try this URL for a cut sheet

31.8 15/16 I think is 31'-8 15/16" long

The abbriviations are more of a mystery but a girt manufacturer might know or they may be clarified on the drawing
I'm sure others in this forum will help much more than I
 

Attachments

  • American_girts.pdf
    27.8 KB · Views: 12
9.5Z12 is a "Z" shape 9 1/2" tall made from 12 gauge material
try this URL for a cut sheet

31.8 15/16 I think is 31'-8 15/16" long

The abbriviations are more of a mystery but a girt manufacturer might know or they may be clarified on the drawing
I'm sure others in this forum will help much more than I
Thank you and Get it!
 
Is it common to dimension the building in millimeters and components in inches in your area? The x-bracing also appears to be in inches.
 

Part and Inventory Search

Sponsor