Continue to Site

Eng-Tips is the largest engineering community on the Internet

Intelligent Work Forums for Engineering Professionals

  • Congratulations SSS148 on being selected by the Eng-Tips community for having the most helpful posts in the forums last week. Way to Go!

surface finish call out.

Status
Not open for further replies.

RoarkS

Mechanical
Jul 10, 2009
264
Howdy!

So I have a customers print sitting in front of me with a general surface finish symbol on a face, and it relates to a note. The note states: "surface marked to have 125"

Everyone at the shop says that it implies 125 or better... and they also say nobody will have an issue if we make it better than they asked.

My argument is that it says "to have". not "or better" or some other ambiguous verbiage. It may need increased friction on one surface...but I don't know what it does. I just have a print.

on the flip side to that my mind then wonders... whats the tolerance on a 125 surface finish!? I have a surface finish tester and the comparison plates... if comparison plates used... better than 250, but rougher than 63?

Whats the word... is our 8 micro inch finish going to get rejected?
 
Replies continue below

Recommended for you

thread1103-318284

When used with a symbol single value is always max average.

When not used with a symbol I (and most I've worked with/met/asked...) tend to infer the same thing, but someone might be able to argue that its use without the symbol is ambiguous.

Giving a single value without it being max then lands you in a situation where as you point out you don't have a 'tolerance' on the value.

If I want deliberately rough surface - as is sometimes the case on optical components I usually use the roughness symbol on the print with max & min given.

So, if it was my part no I wouldn't reject your 8 micro inch finish - I'd just wonder why you went to the effort of making it so smooth when I don't need it and wonder how much extra $ that cost me.

Posting guidelines faq731-376 (probably not aimed specifically at you)
What is Engineering anyway: faq1088-1484
 
Lol! That's just what fell off the mill. I'm just the guy who is checking stuff.

Thanks! I will read up on that thread this evening.
 
Fell off the mill @ 8? Tell them to push that feed up, they're going too slow! :)

Wisecracks aside, KENAT's answer is 1:1 what I would have said.

_________________________________________
NX8.0, Solidworks 2014, AutoCAD, Enovia V5
 
Just a little trivia...As KENAT's link indicates, it's "surface roughness" not "surface finish".

Chris, CSWA
SolidWorks '15
SolidWorks Legion
 
Actually, getting parts significantly better than drawing though meeting the drawing requirement can set inappropriate expectation with the customer. It may be the parts at 8 Ra look and work great. So customer goes into production etc. At some point parts come in at 250, perhaps they don't work, more likely they just don't look as good so even if they make it through QA maybe the assembler notices as part of their 'total quality' efforts and kicks back the parts. Eventually this gets back to you the vendor as a phone call about quality fade or what's going on or ...

Sure you are legally protected as it complies with drawing, and if everyone at the customer is competent in the related fields it should never reach you or at least be resolved very quickly - but that's not always the case.

So remember, since no good deed goes unpunished, creating parts much better than spec can come back to bite you at least indirectly.

Posting guidelines faq731-376 (probably not aimed specifically at you)
What is Engineering anyway: faq1088-1484
 
Then again, a "pretty" part sometimes gets past the inspectors easier than an "ugly" part. ;) If you send one in that just barely meets roughness requirements and other visibly-obvious characteristics, I've noticed that many inspectors seem to go over everything with a very fine toothed comb to try and find something wrong. Whereas there's a lot more confidence in the "very pretty" parts. ;)

_________________________________________
NX8.0, Solidworks 2014, AutoCAD, Enovia V5
 
Unfortunately, like most situations, your vendor is free to interpret any drawing callouts that do not include complete definition however he prefers. And this is a perfect example. For example, what does "surface marked to have 125" specifically mean? Is the 125 roughness value based on RMS (root-mean-squared) or AA (arithmetic average) measurements? AA (or Ra) is the most common metric used to define surface roughness, but where is this defined on your drawing?

I personally prefer the term "surface texture" as opposed to "surface roughness" or "surface finish". "Surface finish" would describe processes like anodizing, electroplating or painting. And "surface roughness" would not include characteristics like waviness or lay. Surface texture callouts can be very complex or very simple, depending on what is required in the finished product. For some situations having a surface that is too smooth is not acceptable. So in this case an upper and lower limit would be shown for the surface roughness.

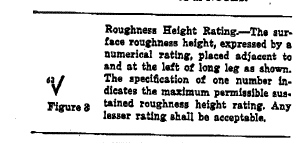
In regards to the question asked in the OP about a single value shown for surface roughness, it is commonly interpreted to describe a maximum limit. Below is an excerpt from a legacy surface roughness standard (MIL-STD-10) describing how to interpret this type of callout.

surface_roughness_height_rating_deqodj.png
 
Status
Not open for further replies.

Part and Inventory Search

Sponsor