Continue to Site

Eng-Tips is the largest engineering community on the Internet

Intelligent Work Forums for Engineering Professionals

  • Congratulations KootK on being selected by the Eng-Tips community for having the most helpful posts in the forums last week. Way to Go!

Torx head profile of a surface questions 3

Status
Not open for further replies.

sendithard

Industrial
Aug 26, 2021
166
I'm trying to establish if there is a need to establish a datum C for a torx head screw, and how it could be done properly with GDT. My only understanding til this point of leaving out locking down rotation is on purely cylindrical revolved geometry.

I just encountered a torx print that did not have datum C and allow rotational freedom in Z. Maybe this is correct, maybe it is dealers choice, and that is why I'm asking.

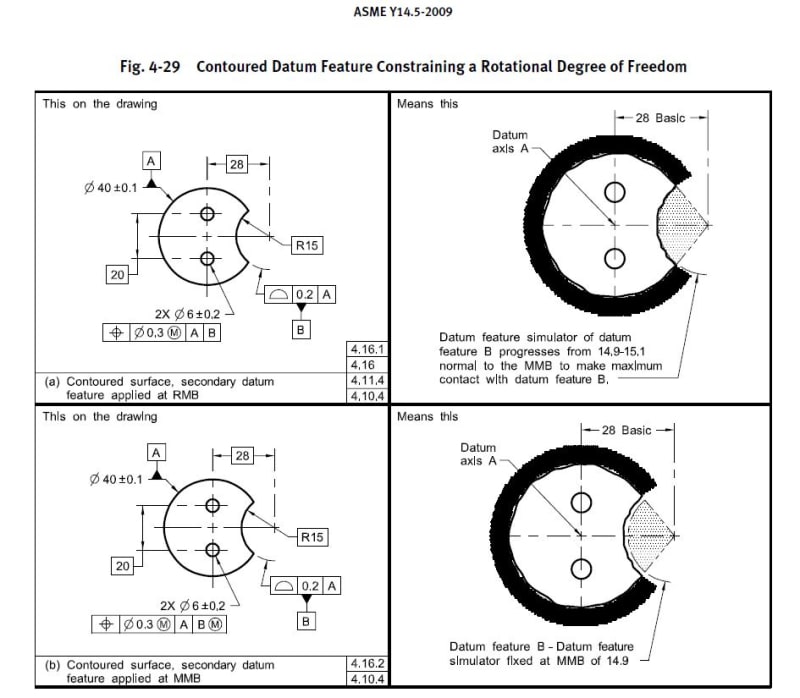
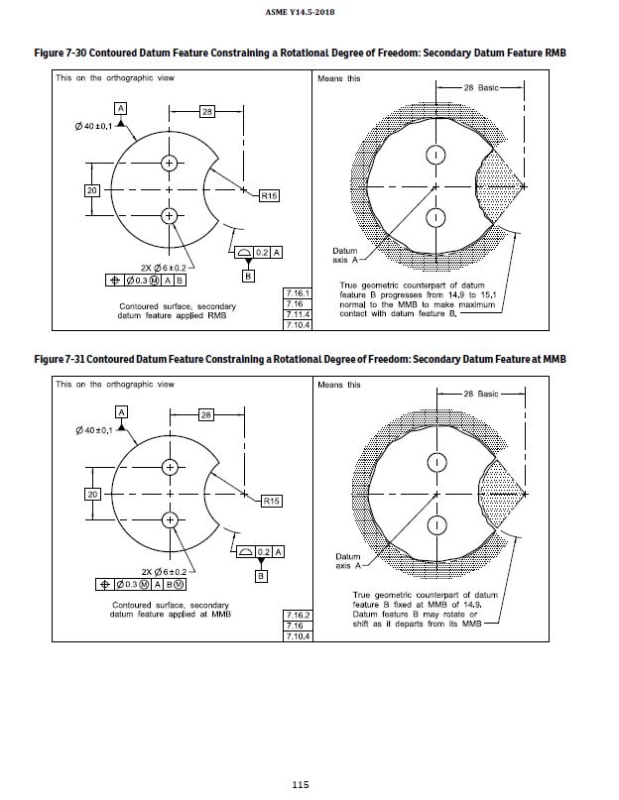
In my attempt to lock down rotation, I attempted to use a radius surface for the datum feature, but when I looked up the standard it shows the radius as a basic dimension then the datum is attached the profile of a surface FCF....both 2009, 2018 standard pics are below....they are in different chapters so I put them below.

If I followed suit into the standard and created datum C from the profile of a surface callout it would conflict with the desired profile callout listed on my print. On the otherhand if datum C is listed as is on my print and I measured this with a CMM and a cad model the profile of a surface could get all messed up depending on the radius.

If I just forgot about datum C and hence rotation and made the radius basic, the problem seems to go away.

I'm confused. Thank for having a look. 2009 Fig. 4-29 & 2018 Fig. 7-30

*edit...the prints I've come across so far with torx like heads use min max diameter as basic dims for the drive head, so I followed suit here.
*edit...the datum surface is not much in terms of degrees....I know that is a problem for cmms,but is there something written about this for the standards?
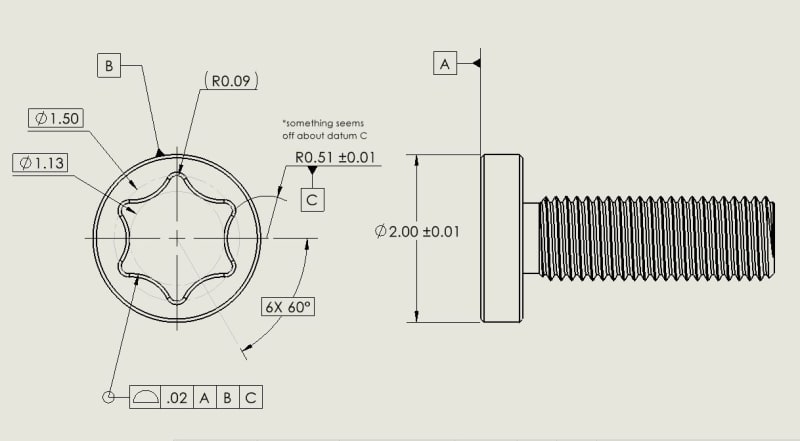
datum_c_issuee_nuv6rb.jpg

radius_datum_2009_czitb7.jpg

radius_datum_2018_dsiefu.jpg
 
Replies continue below

Recommended for you

Burunduk said:
if it is a standard Torx, there is ISO 10664

If it is a standard Torx(tm) then it does not follow ISO 10664, it follows the Camcar Textron specification; they are not identical. E.g. for the size 6 internal hexalobe feature, according to a document I have from 1992 (has it changed?) for the Torx(tm) internal feature it specifies an outside lobe-lobe width of .0680 to .0700 (inches) while ISO 10664 specifies 1,695 to 1,709 (millimeters, conversion: .0667 to .0673 inches).

Comparing to the mating tolerances for Torx(tm) for the T-6 screwdriver the outside lobe-lobe dimension could vary from .0650 to .0670 inches so at the extremes of both features it has a ~.0003" interference with an ISO 10664 hexalobe. Will that situation ever occur? Subject for the "statistics" thread? :)
 
BiPolarMoment,
1,695 to 1,709 mm in ISO 10664 is the size variation for the GO gage, not the size limits for the actual feature.
The NOT GO gage is 1.778-1.785 mm.
Note how the minimum size of the NOT GO (1.778) matches the maximum value you see in your document (.0700 inches).
 
chez - it's correct that the self-reference to C doesn't cause the same problem as when there's use as a location tolerance that loses a portion of the tolerance zone along that part segment to the other side of the datum simulator. Here the worst effect is that it doesn't really help define this particular feature.

Edit: In thinking a bit more on this - since this was an RFS specification - if there was a portion of the feature around the remainder of the perimeter that was slightly out of tolerance, this RFS tertiary reference would prevent shifting that tolerance zone in a way that the datum feature surface remained in the tolerance zone and allowed the other portion to be shifted in; this would reject a usable feature as being unacceptable. Less a problem for the inspector and a big problem for the factory. An MMB reference would preserve the ability to shift it.

Depending on the CMM software there's the potential to scan a few thousand surface points and rotate them to verify they fall into the tolerance zone, so the benefit of a tertiary reference is if the CMM software cannot do that rotation - I would have chosen the smaller radius feature for that purpose, but the CMM inspector can chose their own alignment to minimize the rotation requirement.

In production this inspection most often be done with a digital microscope or Go/No Go gages.

There might also be a use for the tertiary if there was some other feature that had to be clocked relative to the recess and the desire for establishing a simultaneous requirement. One area lacking in the Y14.5 standard is an example of clocking screw threads, though for this recess I can't come up with a need for clocking - it repeats at 60degree intervals which is sufficient.
 
@B... Woops, I skipped the part where I was looking at a gauge definition somehow--the tolerance certainly should have clued me in but since it was in metric it didn't throw up any red flags (+/-.0035, no problem!)
 
since this was an RFS specification - if there was a portion of the feature around the remainder of the perimeter that was slightly out of tolerance, this RFS tertiary reference would prevent shifting that tolerance zone in a way that the datum feature surface remained in the tolerance zone and allowed the other portion to be shifted in; this would reject a usable feature as being unacceptable. Less a problem for the inspector and a big problem for the factory. An MMB reference would preserve the ability to shift it.

I figured there could be some unintended consequences - I agree this could be one of them.

so the benefit of a tertiary reference is if the CMM software cannot do that rotation

I hadn't thought of that, that would be an interesting reason to add a self referencing datum feature however it would align the tolerance zone as you mentioned. Of course as you know the MMB solution would likely aggravate that issue.
 
Chez,

Appreciate the comment. I discussed this a little in the original post as I knew something was wrong...but I didn't see it like you so well said as 'self-referencing'. I just saw it as a problem to have a datum C referenced surface that had a tolerance applied to it. My ambition to to lock this part down in rotation on the cmm overwhelmed my knowledge that it didn't need it in real life. The juxtaposition is that I am probing what I called datum C to clock that part in accurately so the profile can then be appropriately measured against A|B. I learn a lot from you all and I appreciate that you all help educate people with much less knowledge. I'm embarrassed I used a leading zero, I knew better, glad I got smacked for that one.
 
The only embarrassment for a leading or trailing zero should be among those who demand it as a stand-in for specifying the units for a drawing. Specifying the units is already required to be clearly put on a drawing under "IDENTIFICATION OF LINEAR UNITS." So controlling leading and trailing zeros serves no purpose. This is particularly ridiculous since there is a big section laying out how numbers are all considered to have an infinite number of zeros past the last significant digit beyond the decimal point.

The main reason for padding the numbers is just to allow for, on US inch drawings, the practice of putting default tolerances in the title block based on the number of digits - which should be deprecated by now - and isn't mentioned in Y14.5 recent versions; not sure it ever was.
 
I'd like to ask one more question on this torx profile topic, Thanks in advance.

Referencing my original image....I've learned to forget about datum C and I've learned that all profile of a surface surfaces need basic dimensions.

Could you then just make the torx profile of a surface .02|B| in my case...no need to even involve Datum A? I know you can still go A|B if you so choose, but the profile doesn't need A b/c B is a cylinder and takes care of 2 trans & 2 rot.

Thanks for you thoughts.

 
sendithard,
If you do that you won't be controlling the (perpendicular) orientation of the torx feature relative to datum A, only the the (parallel) orientation to datum axis B. It may be enough in terms of degrees of freedom, however doing it that way or not depends on what is functionally important for you. By the way, the datum features need also to be qualified by controlling the form of the primary and in your case (and generally often) the orientation of the secondary relative to the primary.
 
Typically one would want to make it relative to the pitch diameter of the thread. Before the thread is made a cylinder of material will be used to located and orient the part for forming the head and forming the recess. After the head is formed the thread will be rolled onto that cylinder.

Using the pitch diameter ensures that the mating driver would remain in the center and directly aligned with the axis of rotation as the screw was installed, a very important characteristic for automated assembly to avoid damaging the tooling.

The outer form of the head isn't so important and neither is the top surface, particularly as references. The underside will also be formed in relation to what will become the pitch diameter after the thread rolling process; it plays no part in relation to the driving recess.

If this is for training - just measure both ways for the experience.
 
I also agree about the importance of the pitch diameter and it's use as a datum feature.
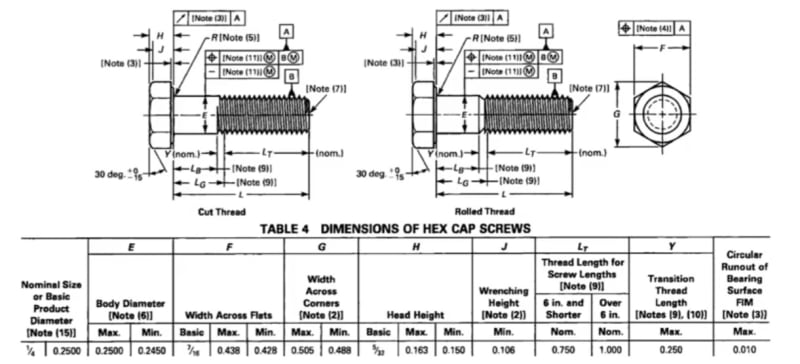
Here is what I consider a reasonable example of a screw drawing. In this case they first related the unthreaded portion of the shank to the pitch diameter of the thread, then used it as a datum reference for other controls, related to the head.

Screenshot_20220523-091145_YouTube_mmxawm.jpg
 
Burunduk,
Which is the standard you have the embeded picture from?
 
It appears to be from ASME-B18.2.1 but I do not know which revision (if that matters to the question).
 
Could you then just make the torx profile of a surface .02|B| in my case...no need to even involve Datum A? I know you can still go A|B if you so choose, but the profile doesn't need A b/c B is a cylinder and takes care of 2 trans & 2 rot.

So several have commented about the use of the pitch diameter which was going to be my first point, ie: make sure your datum feature selection reflects function, so I won't add too much there. However you seem to be asking about DOF constraint and order of precedence so I'll add some notes there. I'll use the convention you have in your drawing to make it simple (A is the top of the head, B is the head diameter).

The order of precedence in which datum features are referenced in your Datum Reference Frame (DRF) is important, and lower precedence datum features cannot constrain Degrees Of Freedom (DOF) that have already been constrained by higher precedence datum features. So A in |A|B| is considered primary and is the highest precedence and constrains [z] translation and [u,v] rotation, and B is secondary precedence and only constrains [x,y] translation. Even though B has the ability to also constrain [u,v] rotation, it doesn't because A has already taken care of those DOF. Now if we switch it to |B|A| then B now constrains [x,y] translation as well as [u,v] rotation, and A only constrains [z] translation. In this latter case of |B|A|, A is no longer as important to this profile tolerance as constraint of [z] adds nothing to this particular tolerance.*

Ultimately as noted above it should come down to part function as to how datum features and their precedence are selected - namely, if we're to continue with your convention of A and B even though we know the pitch diameter is the better choice: A and B should be functional/mating surfaces, and the precedence reflects how the part functions/assembles either A->B in |A|B| or B->A in |B|A|.

If you have access to it I would take a look at the difference between Y14.5-2018 fig 7-19(b) and 7-20(b) (Y14.5-2009 fig 4-20(b)/4-21(b)).

*Not to confuse things, but there are situations where you might want this - for example if you wanted simultaneous requirements to apply with another tolerance.
 
Status
Not open for further replies.

Part and Inventory Search

Sponsor