Continue to Site

Eng-Tips is the largest engineering community on the Internet

Intelligent Work Forums for Engineering Professionals

  • Congratulations KootK on being selected by the Eng-Tips community for having the most helpful posts in the forums last week. Way to Go!

trochoidial stock removal - how to remove stock from around the part with a trochoidial tool path? 1

Status
Not open for further replies.

mechjames

Mechanical
Apr 7, 2011
124
Hi Guys,
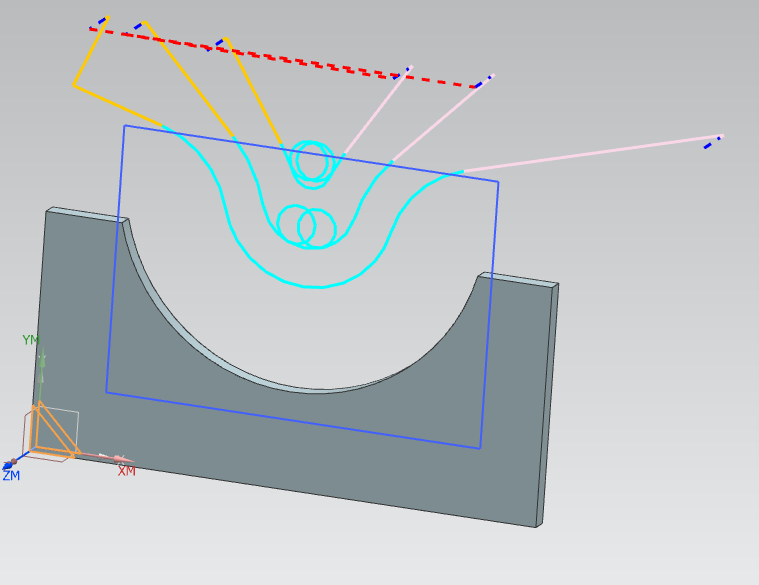
I want to profile a piece of steel as shown in the image. You can see the blank and the final part which has a semi-circle cut from the stock perimeter. Is it possible to remove the main semi-circle of material using a trochoidial tool path and not by using the full width of the tool around the perimeter of the part? Cavity mill will work but
as shown I can only get it to do a conventional slot type toolpath. To get a trochoidial toolpath do I have to model in the slot, apply the trochiod cutting parameters from there and do it that way? Is there an operation or technique that will do what I want without modifying the part?

getfile.aspx


cheers,
James
 
Replies continue below

Recommended for you

Hi James,
You could sketch in a trim boundary and do two operations?

Draw the area you'd like to machine, go back into manufacturing, back to your operation and select "Specify Trim Boundaries", trim the outside. then run a conventional "Follow Part" on the rest.

See image
Capture_bta24s.png


Regards

Dave
 
Hi Dave,
many thanks. That is exactly what I have been trying to do! Never used specify trim boundries as I could find no examples. Could you post your part file so I can see exactly how it is done...

many thanks,
James.
 
No problem :)

On mobile at the moment, I'll try to explain instead

Make a new sketch on your part (doesn't matter where it is along Z height in this case, just put it anywhere on the XY plane)
Make the sketch "box"/area large enough so it doesn't impede on it's cutting of the part/area that you're trying to machine.

Create your operation as you normally would, go to specify trim boundaries, select "curves" in the selection method drop down and select your curves of the square in a clockwise or anticlockwise fashion so they join in order. If you want multiple separate trim boundaries on a single op', click add new set and choose a new set of curves.

Remember to choose "side trimmed" correctly, with reference to my example, I chose OUTSIDE; it is ignoring (trimming) the OUTSIDE. Select INSIDE and it will machine everything but your sketched area.

Hope this helps.

Regards

Dave
 
Hi Dave,
got it! That is pretty cool. Very very useful :)

cheers,
James.
 
Status
Not open for further replies.

Part and Inventory Search

Sponsor