Continue to Site

Eng-Tips is the largest engineering community on the Internet

Intelligent Work Forums for Engineering Professionals

  • Congratulations waross on being selected by the Eng-Tips community for having the most helpful posts in the forums last week. Way to Go!

Dimensioning a Ruler

Status
Not open for further replies.

TopPocket

Mechanical
Feb 16, 2022
50
Hi,

So I've found one of those "sounds simple at first" problems.

I have a part with a laser marked scale, imagine a glorified ruler.

I need to specify the tolerance of the laser marks, specifically three things:
- Absolute position of each mark from end face
- Line Spacing between adjacent marks
- Thickness of each mark

Now the standard method would obviously result in an absolute mess, as the scale is 140 mm long (1 mm increments).

Is there a better way?

I've considered using position and TEDs but I think it is unclear. The most important thing is the absolute position of each line from the end face, so this is what I wish to be inspected, not a bunch of 1 mm increments.

There's ordinate dimensioning but I don't know how that works (oh I'm ISO btw, spice it up a bit).

I feel like there should be a way to start speccing them from the end face and do a kind of "..." ?

Any help would be appriciated.

Here's a pic for reference:
scale_engtips_pic_qj92oy.png
 
Replies continue below

Recommended for you

Since you need all marks accurate relative to a reference, what if you make the end edge from which the marks must be located and the edge along the length of the ruler to which they must be perpendicular your datum references, and specify profile of a line to control the pattern of them all?
 
Position tolerance is probably the most clear and easiest option. Make the spacing between each mark a TED of 1mm. The linewidth can remain a limit tolerance. Attach a position tolerance to the midplane of the line width and I'd suggest using the front or back face as your primary datum, the top face as your secondary and the end face tertiary. I'd probably do the linewidth and 1mm dimension in a zoomed in detail view for clarity.

Ryan.
 
Hi, thanks for the speedy response.

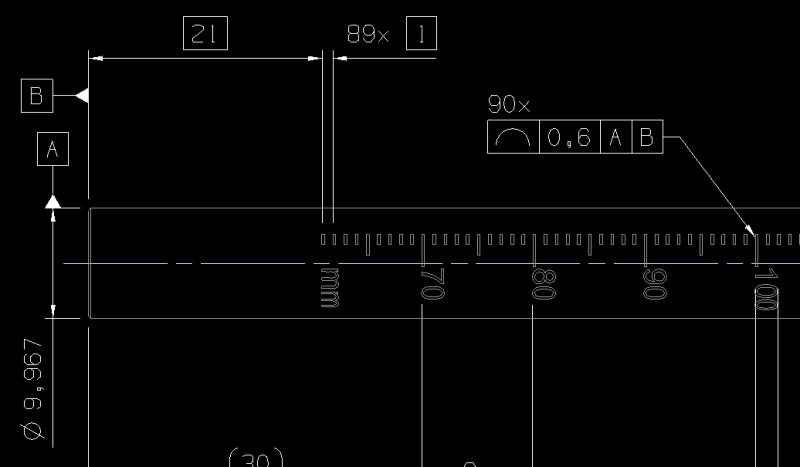
I had a go putting position on it,
image_1_ijiosw.png
see below.

I'm not sure if this is very clear though as I think it could be interpreted as inspecting all the 1mm increments, rather than all the absolute positions.

Also:
- this part is a round bar
- the spacing and thickness are in a detailed view, I just put them there as a summary.
- is my use of datums for the position correct?
- I'll be measuring these as points which is why i've used postion, but profile of a line is an interesting consideration.
- there are several of these parts, some specced to the edge of the mark, some to the midpoint. This is described with a note.
 
You're not supposed to place the datum feature indicator on a centerline. If you want the datum to be a center plane, you are supposed to attach it in line with the width dimension.

Also that center plane is not a reference that can be used for location in the length direction.
 
shamed... I have done it properly elsewhere on the drawing I promise! :) we all know what I mean tho.

ahh so I should really be putting a datum on the end face too, though it is the the axis (A) that defines the orientation, so maybe the position should be to A B like: |pos|Ø0.6|A|B| ?
 
I guess inspecting this should give a list of measurements like so:

"61" Line | 0.02
"62" Line | 0.21
"63" Line | -0.10
"64" Line | -0.35
... etc for all lines.

I'm guessing the reported value would be the larger deviation from the nominal in either direction...
 
Top Pocket said:
I'm guessing the reported value would be the larger deviation from the nominal in either direction...
- doubled. Because if you get to one of the limits of the zone by offseting half the tolerance value from nominal, it is considered that you utilized the entire tolerance band. So, any deviation is doubled.

Other than that, your new drawing looks OK.
Just note that the profile of a line tolerance doesn't control the length of the marks, so I guess for full definition (if intended) there would be some additional requirements needed.
 
That does make sense, but it is also quite confusing and sounds like a source of problems.

If I spec it as a position instead would it be the same?

Does this mean all outputs are positive and agnostic of direction?

I'd quite like to know which way the marks are out by, so perhaps, for once, GD&T isn't my friend.
 
The width of each mark may be difficult. I think it depends on power of laser. Then after finishing, it can change.

Chris, CSWP
SolidWorks
ctophers home
 
TopPocket,
The doubled-deviation value is the one that allows comparison to the specified tolerance value, so it is the answer to within what number you hold the tolerance. But it doesn't have to be the only value reported, and it is totally acceptable to document additional data like the local deviation values from the basic geometry, with negative/positive signs to indicate deviation directions (a coordinate system that corresponds to the measurement set up is often included).
 
TopPocket,

Interesting problem. If the process isn't capable there will be nearly a 100% scrap rate; the parts are unlikely to be reworkable if any of the marks is out of position or the wrong width. The largest problem is indexing the laser to the end of the part.

Since the marks are, apparently, filled areas/widths there's no line to apply the profile of line to unless it is to each side independently. Since the marks are of small depth there won't be a difference notable between profile of line and profile of surface.

Since it is ISO you can apply position tolerance to each side of the filed area for whatever that's worth.

It will likely require an optical microscope and camera to get sufficiently precise measurements. Look those down and use gage blocks to move the rod in 1mm increments to position for each photo.
 
TopPocket said:
 If I spec it as a position instead would it be the same?  

If you're asking in terms of the reported value, then it's similar; you would still report the size of the smallest zone constrained to the theortically exact location that would encompass the element you are controlling as produced. So, you would not understand the direction of deviation from looking at the measured position value, but you would from the additional data documented.
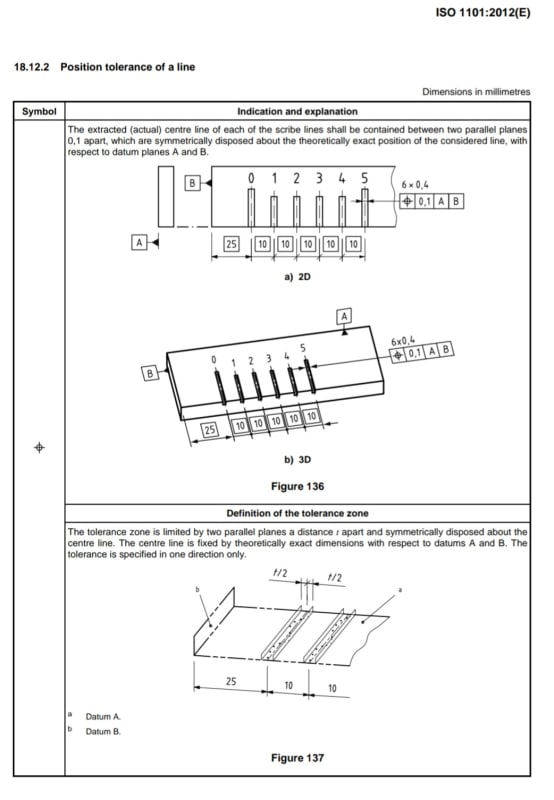
For what it's worth, if the result of a laser mark is comparable to the scribe line, I guess position can work too:

Screenshot_20240216_162814_Drive_khmbkr.jpg
 
I wonder why they call them lines when they are clearly straight sided slots. I suppose the ISO committee has to pander to the demands of some contributors just as ASME does.
 
3DDave, Is it even realistic to machine "scribe lines" that are rectangular slots?They are usually made with either a small size ballnose end mill that leaves a slot with a round cross section or a dedicated scribing tool with a conical tip that leaves a triangular slot. If it's milled by a ballnose end mill, chances are that the depth of the slot will be smaller than the radius. I wonder what tolerances they would exemplify for that as part of a figure in a tolerancing standard.
 
The majority I have encountered are either crap that is roller impression formed or an excellent job of photo-etch.

Somehow typography, which markings are closer to, has managed well enough without geometric tolerances.
 
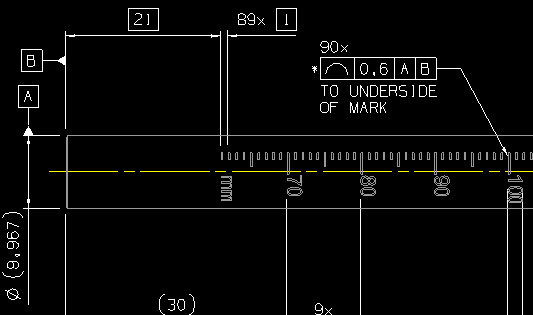
ENGTIPS_SCAKLE_rynp72.png


So I think I'll go with this for defining the absolute position of each mark.

My question is whether I need the datum A? or would B be sufficient?

I only included A to orientate the datum, but is that making it more confusing?

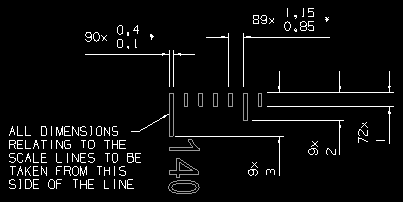
entips_tic_wae4ek.png


The other dimensions are taken care of here.

ctopher:

Laser marking is indeed a dark art as I have learnt the hard way over the last few years. There are many things that may affect the quality of the mark including power, speed, frequency, focal length, fill type, laser type, passivation order and material. If done correctly the mark should have a sheen to it and be only a few microns deep.

3DDave:

The can actually be reworked by taking a skim off the surface and re doing it, as long as you've got material left to remove and still be in spec that is. If the marks are too deep you can sometimes see ghost marks.
We're inspecting this using optical methods, Keyence, Aberlink etc.
 
You do need your datum A as primary to orient the tolerance zones, otherwise, if you only use B, any out of perpendicularity of the B end face relative to the cylindrical surface will make the orientation of your marks way off relative to the axial direction.

Other than that, I'm not sure you need the 89X 0.85-1.15 spacing since you have the basic spacing of 1 mm under control by the profile of a line tolerance.
 
Still, unable to rework only the portion that is out of tolerance. And whatever made the part incorrectly the first time will make the part incorrectly the next time.

Redraw the part using the maximum variation you are allowing. Flip a coin on each mark to use the max or the min. See if that looks like a good result.
 
Status
Not open for further replies.

Part and Inventory Search

Sponsor