Continue to Site

Eng-Tips is the largest engineering community on the Internet

Intelligent Work Forums for Engineering Professionals

  • Congratulations waross on being selected by the Eng-Tips community for having the most helpful posts in the forums last week. Way to Go!

Fig 6-30/ ASME 2018 2

Status
Not open for further replies.

Kedu

Mechanical
May 9, 2017
193
Is Ø31.6 - 31.8 outside diameter controlled to profile within 0.5 to |A|B| and shown circular runout (0.1|C|) it's only refinement?
How do I treat the circular runout?
 
Replies continue below

Recommended for you

Kedu,

Note 2 says Unless Otherwise Specified - I would say the diameter tolerance, as well as the circular runout tolerance, classifies as "Otherwise Specified". I don't think the profile tolerance to |A|B| applies to that feature.
 
Chez311,
I see. Thank you.
Could you provide an example within which the additional geometrical tolerance is considered as refinement and does not nullify the general unless othwerwise specified?
 
Kedu said:
Could you provide an example within which the additional geometrical tolerance is considered as refinement and does not nullify the general unless othwerwise specified?

I am not Chez, but I will try:

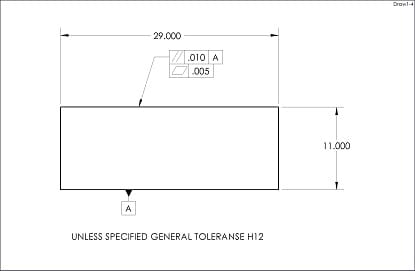
Draw1_vfthk1.jpg


Parallelism is a refinement of size, flatness is a refinement of parallelism, but Envelope rule still in full effect.

(11h12 = 11 +.000/-.020)

"For every expert there is an equal and opposite expert"
Arthur C. Clarke Profiles of the future
 
I am not Chez either, and I will try too:
If in the very same figure 6-30 you remove profile within 0.1 to A (primary) from the right face of the part in the section view, I might argue that now the right face is LOACTED by the general profile unless otherwise specified "UOS ALL SURF profile 0.5|A|B|
 
Kedu,

I would say that application of a tolerance which applies generally to all features and not "UOS" is probably typically ill advised unless you are very careful that it does not conflict with any other applied tolerances. For example if the profile tolerance in 6-30 did not apply "UOS" it would be applied to a cylindrical RFOS with a +/- directly toleranced diameter - if not outright incorrect (I would say this is wrong) it would be highly suspect.

A more practical example might be a general tolerance which is narrower in scope - namely it only applies to certain features or in certain situations. While perhaps not strictly a "general tolerance" or "refinement" CH's example of the envelope principle does this - it only applies to RFOS subject to a size tolerance. Another example could be where there is a compound datum feature |A-B| consisting of two coaxial diameters a general tolerance "ALL CYLINDRICAL FEATURES COAXIAL TO |A-B| SUBJECT TO 0.2 TOTAL RUNOUT TO |A-B|" or something similar.

A few interesting points of note on general profiles tolerances:
1) The way I read Y14.5-2009 section 8.2.3 (Y14.5-2018 section 11.2.3) is that any profile tolerance applied in a general note/general tolerance block is applied "UOS" even if it doesn't explicitly say so.
2) Y14.5-2009 section 8.3.1.6 (Y14.5-2018 section 11.3.1.5) seems to suggest that a profile tolerance applied "All Over" - regardless of how applied (term "ALL OVER" applied to FCF, the "All Over" symbol on the leader line, or in the general tolerance note/block) only applies "UOS" even if it doesn't explicitly say so.
 
In fig. 6-30, does the UOS profile apply to the 36 basic diameter? If not, what if the diameter needed to be additionally controlled with profile 0.5 to A|B?

If in fig. 6-30 the profile tolerance applied to the 36 diameter had no datum feature references, would the UOS profile appply then?
 
Chez311,
chez311 said:
application of a tolerance which applies generally to all features and not "UOS" is probably typically ill advised unless you are very careful that it does not conflict with any other applied tolerances.

How would you recommend the verbiage to be to avoid any potential conflict within UOS and any other applied tolerances?
I might agree that if the verbiage is not clear (and the UOS does not have a clear definition) a potential misunderstanding could happen.

How do you think this note could be improved?


In fig. 6-30, does the UOS profile apply to the 36 basic diameter? If not, what if the diameter needed to be additionally controlled with profile 0.5 to A|B?

Considering it has been "otherwise specified" with another requirement - namely the 0.2 profile to |C| then I would say it doesn't. If it needed an additional profile control to |A|B| then it would have to be added explicitly.

If in fig. 6-30 the profile tolerance applied to the 36 diameter had no datum feature references, would the UOS profile appply then?

I would say a datumless profile tolerance would qualify as "otherwise specified". While maybe thats a hard line to take I think if it doesn't that opens another can of worms - is it only "otherwise specified with datum feature references" or "otherwise specified with more DOF constrained" etc.. Obviously thats less than ideal in this case as it would mean that feature is unconstrained but its up to the designer to ensure that each feature is sufficiently controlled.


greenimi,

I'm not sure I fully follow what you're asking. What verbiage/note are you referring to? The note in 6-30? I don't see an issue with that note.

FYI Y14.5-2018 has been updated to include a definition of Unless Otherwise Specified. Whether or not this is "clear" or bulletproof definition may be up for debate.

ASME Y14.5-2018 section 1.4.1 said:
(g) The phrase “unless otherwise specified” (UOS) shall be used to indicate a default requirement. The phrase is used when the default is a generally applied requirement and an exception may be provided by another document or requirement.
 
chez311,

chez311 said:
Whether or not this is "clear" or bulletproof definition may be up for debate.

chez311 said:
I would say a datumless profile tolerance would qualify as "otherwise specified". While maybe thats a hard line to take I think if it doesn't that opens another can of worms - is it only "otherwise specified with datum feature references" or "otherwise specified with more DOF constrained" etc.. Obviously thats less than ideal in this case as it would mean that feature is unconstrained but its up to the designer to ensure that each feature is sufficiently controlled.

That's exactly what I am asking. How would YOU fix the conundrum ones for all...a.k.a. no more debate?


greenimi,

I don't necessarily believe, nor do I think I said, it needs fixing. I took a hard line interpretation in my above responses to tim_member and I think if you interpret it as such the definition is pretty clear. I just said it may be open for debate because (1) I haven't imagined every iteration of UOS and possible exceptions, loopholes etc.. and (2) I don't know that everyone will agree with my hard line interpretation.
 
Also default "Unless Otherwise Specified" requirements can come in a myriad forms. It may be a bit much to expect a single definition to cover all cases.
 
chez311 said:
I took a hard line interpretation in my above responses to tim_member and I think if you interpret it as such the definition is pretty clear. I just said it may be open for debate because (1) I haven't imagined every iteration of UOS and possible exceptions, loopholes etc.. and (2) I don't know that everyone will agree with my hard line interpretation

chez311,
That is fine. My question has been (and still is) what note(s) you would put on YOUR drawing to tell the end user that the "hard line" interpretation is needed/expected? In other words how do you know the people will go to the "hard line" interpretation and not to the "soft one" (the opposite one)?
How would you make sure the readers would have the interpretation you want/expect them to have?
 
My question has been (and still is) what note(s) you would put on YOUR drawing to tell the end user that the "hard line" interpretation is needed/expected?

Let me be a little clearer - I don't think any addition to the note other than "UOS" would be necessary. My opinion is that the onus would be on those who would take another interpretation to explain why.
 
chez311 said:
Let me be a little clearer - I don't think any addition to the note other than "UOS" would be necessary. My opinion is that the onus would be on those who would take another interpretation to explain why.

greenimi said:
greenimi (Mechanical) 7 Nov 19 13:01

I am not Chez either, and I will try too:
If in the very same figure 6-30 you remove profile within 0.1 to A (primary) from the right face of the part in the section view, I might argue that now the right face is LOACTED by the general profile unless otherwise specified "UOS ALL SURF profile 0.5|A|B|

Okay, I understood.

So, in my "adjusted case" of no profile for the right face in the section view/left view (pretend profile within 0.1 to A primary is not shown on the print) then your interpretation is that the feature is NOT LOCATED (or in other words does not have a complete control)
That feature is only oriented (parallelism within 0.06 to A primary stay unchanged), but its location is not defined.
Am I correct?

You don't use the location control provided by UOS ALL SURF (profile 0.5|A|B|). Am I missing your point, so far?

 
greenimi,

That would be my interpretation, yes.

As I said I know thats a hard line approach - I would be interested to hear other opinions. That said, if someone says otherwise and the location constraint provided by the general profile tolerance can be applied in that case I think it would have to be explained how to use said location constraint on the 31.6-31.8 feature if the 0.1 circular runout to |C| is removed.
 
Status
Not open for further replies.

Part and Inventory Search

Sponsor