Navigation
Install the app
How to install the app on iOS
Follow along with the video below to see how to install our site as a web app on your home screen.
Note: This feature may not be available in some browsers.
More options
Style variation
-
Congratulations cowski on being selected by the Eng-Tips community for having the most helpful posts in the forums last week. Way to Go!
You are using an out of date browser. It may not display this or other websites correctly.
You should upgrade or use an alternative browser.
You should upgrade or use an alternative browser.
Unilateral Tolerance vs MAX MIN
- Thread starter umatrix
- Start date
- Status
- Not open for further replies.
CheckerHater
Mechanical
MAX and MIN are "single limit" tolerances and not intended to be used together.
You can specify your tolerances as unilateral, bilateral, symmetrical, or as limits - 21/20.
"For every expert there is an equal and opposite expert"
Arthur C. Clarke Profiles of the future
You can specify your tolerances as unilateral, bilateral, symmetrical, or as limits - 21/20.
"For every expert there is an equal and opposite expert"
Arthur C. Clarke Profiles of the future
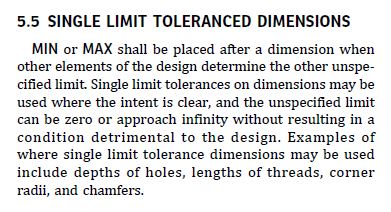
Just to add to what CH noted, what standard do you go by? ASME Y14.5-2018 has the below to say about single limit MIN/MAX tolerances. The 2009 version is similar in this respect - MIN and MAX have special meaning and are not interchangeable with any variation of +/- tolerances including unilateral, bilateral, and limit. Limit dimensioning is probably what you were thinking of and would just be denoted 21/20 without any MAX/MIN notation.


My preferred method is to use symmetric tolerancing (20.5 +/- 0.5, in this case). All the methods that CheckerHater mentioned effect the same result when toleranced appropriately, but drawing dimensions are commonly generated from 3D CAD data that is also used to program toolpaths with CAM software. If your model is created at one extreme or the other, file or toolpath manipulation will be required to target middle tolerance during manufacturing (also note that the nominal dimension is not considered a "target" for manufacturing purposes).
You can help to eliminate potential sources of confusion for your programmer, machinist, inspectors, etc. by using symmetric tolerancing which will in turn make your life easier.
Jake
You can help to eliminate potential sources of confusion for your programmer, machinist, inspectors, etc. by using symmetric tolerancing which will in turn make your life easier.
Jake
I think you mean upper/lower limit, not max/min. (Ticky-tacky wordplay, but important enough).
Sometimes the model doe not allow one to put things at the median value. Some people hate the math involved with non-symmetric (or even symmetric) tolerances. Limit dimension is a nice way to skirt that. Of course, now they need to find the median. Use whatever generates the least gripes.
Sometimes the model doe not allow one to put things at the median value. Some people hate the math involved with non-symmetric (or even symmetric) tolerances. Limit dimension is a nice way to skirt that. Of course, now they need to find the median. Use whatever generates the least gripes.
TheTick,
The correct term is limit dimensioning. If I am going to take calipres to this thing after fabrication, limit dimensioning tells me what I need to know without me doing any arithmetic. Plus minus tolerances can be useful when they show the actual model size in addition to the tolerances. 40-0.02-0.06?
--
JHG
Jake,
At the risk of pointing out the obvious, limit dimensioning can be used the same way as symmetric tolerances with CAD geometry modeled in the middle of the tolerance zone by applying an identical tolerance to both plus and minus. It doesn't have to be and often isn't used that way, but the fact remains it could be.
Of course thats not the case with unilateral/unequal bilateral.
jasoncwells
Aerospace
There are good reasons to choose bilateral vs unilateral vs limits of size.
The range in the unilateral tolerance can be mathematically identical to the range in a bilateral tolerance. But the nominal value is different. A nominal value is given with a bilateral tolerance and also with a unilateral tolerance. A nominal value is NOT given with limits of size.
tl;dr pedantic commentary follows:
This has an effect when quality comes into consideration. There is a great example in a study of Sony Japan vs Sony USA TV screens. The difference was that Japan shot for nominal and the US shot for "between the goal posts." Japanese made screens were considered to be of superior quality. Both passed quality checks. I think there is also a great video by Ford on youtube about this topic vis a vis statistical process control.
The ASME specs for clearance holes provide for limits of size. The lower limit of size is the MMC and also the nominal value in almost every case. A 1/2 inch nominal clearance hole would be 1/2 to 9/16 for example.
I argued in favor of limits of size for holes to an engineer who was a tool and die maker in a previous life. He explained, "But what is the machinist shooting for?" I was sure it didn't matter because math. I was wrong. The math might be the same. There is a difference in intent and outcome.
I think when you say "MAX/MIN" you really mean to say "limits of size."
Regards,
Jason C. Wells
It's really a fundamental flaw that "tolerance of variation," which should be the mantra of Dimensioning and Tolerancing, rather than the "tolerance" as some abstract notion for doing addition and subtraction.
The tolerance of variation should include the distribution of possible variations allowed by that tolerance of variation. Most of Y14.5 is dedicated to the idea that the distribution is a uniform distribution over an acceptable range for which no examples outside that exact range will ever be found acceptable.
At the same time the major proponents also allow a rule-of-thumb 10% error in making that determination which either accepts parts outside the range or narrows the range in an unexpected way.
What the Japanese were working on was narrowing the normal (Gaussian) distribution around a single value. This makes sense for cases where exiting either side of the range has similar consequences. For holes this isn't true; on the small side, the fastener will not fit. On the large side there might be some decrease in bearing area for the fastener head.
As long as the focus is on elementary school level math, problems in deciding which case matters will remain. Even the sometimes applied "central limit theorem" to perform and RSS analysis for suitably large stack-ups, while often a good approximation, still ignores that the actual distribution of variation in a manufacturing process may not be uniform or Gaussian. I watched such a process produce a near 10% failure rate because QA decided to narrow a variation range by dialing in the machining process. They fixed the one problem and made sure it created another one.
- Status
- Not open for further replies.
Similar threads
- Replies
- 19
- Views
- 10K
- Replies
- 5
- Views
- 3K
- Locked
- Question
- Replies
- 28
- Views
- 4K
- Locked
- Question
- Replies
- 59
- Views
- 4K
- Question
- Replies
- 32
- Views
- 9K

