Continue to Site

Eng-Tips is the largest engineering community on the Internet

Intelligent Work Forums for Engineering Professionals

  • Congratulations KootK on being selected by the Eng-Tips community for having the most helpful posts in the forums last week. Way to Go!

Surface Profile Tolerance Without Datums - is it flatness? 2

Status
Not open for further replies.

Radius1

Mechanical
Jan 13, 2021
37
Applying a surface tolerance on a surface without datum reference. Is this flatness? My knowledge is limited in GD&T.

Is this true ? I am having a hard time seeing it.

I want to ensure that the profile of the surface is 1mm. I did not want to reference datums, as I read datums were not required for profile tolerances.
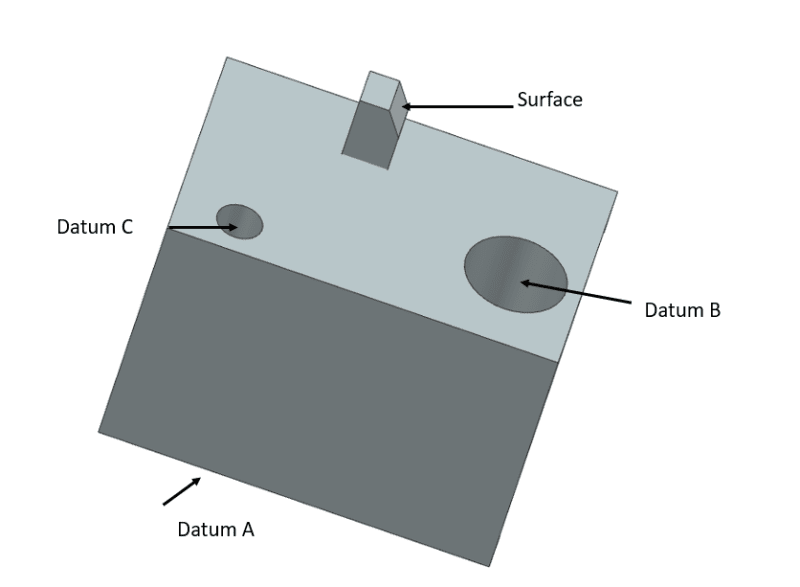
Tab_pwuxrv.png
 
Replies continue below

Recommended for you

If the surface is nominally flat (design intent) than, I would yes, yes it is flatness.
If the surface is not by intent flat (curved surface) than, I would say you cannot say "it is flatness" and datumless profile is controlling only the curved surface's form.
 
Radius1:

The differences are that profile cannot control the flatness of the midplane of a planar feature of size and a profile can control non-flat surfaces.

If you have "a hard time seeing it" then draw a picture of what you think is being controlled and post that so others can understand the problem.
 
Hi 3DDave,
Good suggestion. I have edited the post to include more information.
 
To solve tolerancing problems one should start with an analysis of what you can tolerate. That involves deciding if there is a frame of reference for evaluating that measurement.

The picture I expected would have shown why you think flatness and profile are different so that it was clear what you were expecting to tolerate.
 
Looks at what I wrote. Looks at question. Sees no overlap between those two. Sorry greenimi, I have no idea what you want.
 
greemini,

I assume you wanted to write "can't control the flatness of the midplane [...]".
Here's the definition from Y14.5:

"11.2 PROFILE
Profile tolerances are used to define a tolerance zone to
control form or combinations of size, form, orientation,
and location of a feature(s) relative to a true profile.

11.2.1 Types of Profile Tolerances
A profile tolerance may be applied to an entire part,
multiple features, individual surfaces, or individual
profiles taken at various cross sections through a part."

Other important definitions:

3.37 FLATNESS
flatness: the condition of a surface or derived median plane
having all elements in one plane.

3.49 PROFILE
profile: an outline of a surface, a shape made up of one or
more features, or a two-dimensional element of one or
more features.

 
greenimi said:
"So, are you saying that profile "can control "

Can control.
Can control.

If you Copy/Paste it makes the original question far different, doesn't it?

Perhaps this is a nitpick over not parroting verbatim a quote from the standard? If so just say so.

Say "ACTCHUALLY IT'S THE DERIVED MEDIAN PLANE"

 
greemini
I copy pasted the standard because it speaks for itself. And you made a typo in your copy paste.

Flatness can control a derived median plane. Profile can't. There's literally no "derived median plane" in the Tolerance of Profile section in the standard.
 
this is why GD&T intrigues me and is my least favorite topic at the same time. So many interpretations, I am taking the course for a second time.
 
Perhaps a CMM expert could weigh in. How would this part be inspected without reference to datums, as opposed to a control frame with references to A B C
 
Without datums, "Surface" would be measured like flatness. Run through and indicator and measure the deviation if it's within spec.
With datums, you'll need to establish a datum reference frame from ABC then measure the "Surface" with a CMM (in this case it would be the best).
However in this case profile controls FORM, SIZE, LOCATION, ORIENTAION. So it can't bend, rotate, translate etc. While flatness just controls the plane itself, not where it is, how it's aligned to others etcetcetc.
 
Interpretations abound due to the sloppy writing and misappropriation of common vocabulary in what is indistinguishable from a concerted effort to sell training courses and materials.

The math part is mostly simple - define a tolerance zone and, if required, fix that zone in orientation and or location relative to other features. Then add 300+ pages not building on that, but adding terms taken and misused from other areas.

Ah well. It's a living for some.

I find it a useful tool and, like all tools, one must first understand the task for the tool to make sense. Unless you have seen parts failing to fit when you expected them to and worked through some attempt at why they didn't fit as you expected them to, then a tool to fix a problem you don't understand is not going to make sense.
 
Ok. Understood. That clarifies a lot.
You are talking about the flatness applied to the feature of size and not the profile being applied to the feature of size.

 
how do you intend to check that surface? flatness and profile without datums of a flat surface would essentially be inspected the same in the real world - regardless of definitions. Not too sure of scale, but that surface looks so small... what does this block do? its pretty simple to fixture a part and check that surface with a flush gauge - which means profile referencing datums. or CMM...

When putting controls on drawings, try to actually imagine what they mean, and how they will be inspected. Checking flatness by definition of a surface a couple times larger than the indicator point used to gauge it is silly. Is it essential to function to have a flatness or "profile without datums" controlling it?! does its location not even matter?? jam a flatness callout on it... that means a flat plate with an indicator protruding from it. sweep it around the surface and the indicator must read in tolerance. if that surface is say, .500"x.500" - ask yourself, "how critical is this thing that they need to put every part up on the CMM table?!" these fun controls also cost money. they are not just squiggly lines and dumb definitions...
 
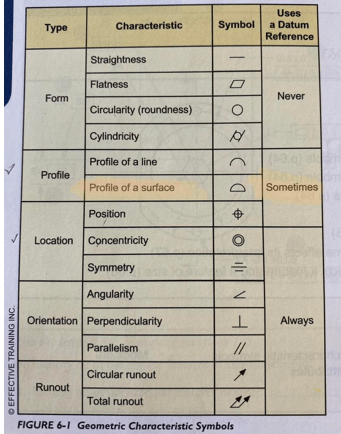
Here is the table from Alex K's book that states that datums are sometimes used as a reference with profile of a surface.

The question is when?

Form_sqonx2.png
 
me said:
define a tolerance zone and, if required, fix that zone in orientation and or location relative to other features

Datum feature references are used if it is required to fix that zone in some orientation and or location relative to other features.
 
Radius1,
Datums are used in a surface profile tolerance whenever there is a desire that the tolerance must control orientation and/or location of the surface with respect to the referenced datum(s).

In absence of any datums, a surface profile tolerance is only capable of controlling form and potentially size of the toleranced feature. But if the toleranced feature is a flat surface in nominal, like in your example, then the only characteristic of the feature that it controls is form, namely flatness.

Things change if there is more than one surface controlled with a single surface profile callout supplemented with a 'nX' quantifier. In such case, per ASME Y14.5 rules, the datumless profile callout not only controls form of each of n features, but also mutual relationship between them (mutual relationship within the pattern as people sometimes like to call it).
 
Pmarc,

Just a follow up question: Could one use angularity on the shown surface (called "SURFACE") with two leaderlines, one leaderline pointing to the "SURFACE" and the other leaderline pointing to some other surface. This way, I think the flatness is also controlled.
The only issue, I could see if this "solution" (datumless angularity) is not currently supported by the ASME standard, isn't it?
How do you see this from future standard development?

And another question: is this "solution" supported by ISO GPS?

Again, I am thinking something applicable to orientation controls, angularity, perpendicularity and parallelism.
 
Status
Not open for further replies.

Part and Inventory Search

Sponsor