Continue to Site

Eng-Tips is the largest engineering community on the Internet

Intelligent Work Forums for Engineering Professionals

  • Congratulations KootK on being selected by the Eng-Tips community for having the most helpful posts in the forums last week. Way to Go!

Rule #1 envelope question 1

Status
Not open for further replies.

sendithard

Industrial
Aug 26, 2021
178
With rule #1 a feature of size must be in perfect form at MMC.

Where this confuses me is I thought if you apply MMC *with* positional tolerance then the hole can be out of perpendicularity up to the tol zone amount.

Am I thinking correctly whereby you would need a FCF with zero positional tolerance to be enforcing rule #1 on a part? If you instead apply the above FCF with .10 tolerance then at MMC the hole could be out of perfect form, no?

Thanks.
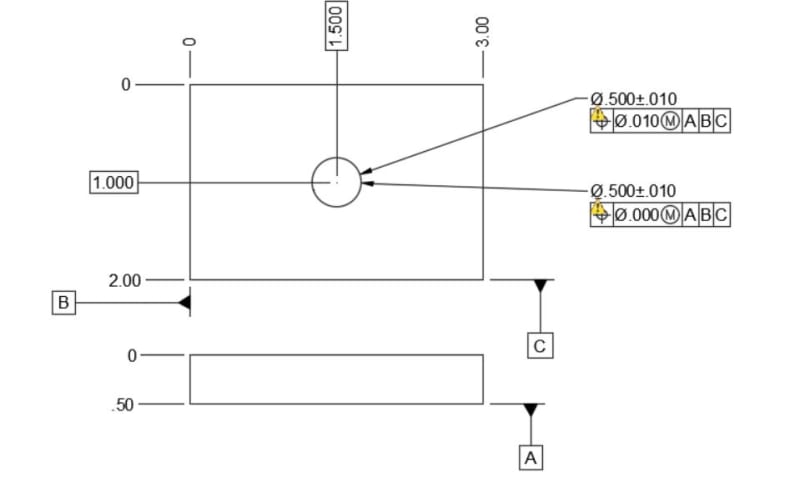
Capture_jxm1g6.jpg
 
Replies continue below

Recommended for you

If you want to "cover" for Rule#1 --to be shown- you might need straightness of zero at MMC.
Form (straightness, circularity, cylindricity, flatness) and location (your shown position) are two different things.
 
Am I thinking correctly whereby you would need a FCF with zero positional tolerance to be enforcing rule #1 on a part?

No, rule #1 is always enforced unless otherwise specified on ASME Y14.5 compliant drawings. Your size tolerance dictates that the hole may not violate a boundary of size .490 (UNCONSTRAINED to any datum features) in either case. The difference lies in the position tolerance so that in your upper case it also must not violate a boundary of size .480 CONSTRAINED to A|B|C whereas on your lower case it also must not violate a boundary of size .490 CONSTRAINED to A|B|C. That means in your upper case that a feature at MMC size .490 it may still have position/orientation error (.01 at MMC), but in the lower case at MMC size your position/orientation must be perfect (0 at MMC).
 
Chez,

I believe I understand this, but where I get confused is if you give the hole positional tolerance it then is allowed to be out of form at MMC, seemingly violating the rule. It seems if you do anything other than give it a zero tolerance the rule doesn't meet reality.

I understand your quote below, but at .490 you are at MMC and due to the .01 tolerance you are allowed to deviate from perfect form. But then the standard says you can't.
" a feature at MMC size .490 it may still have position/orientation error (.01 at MMC)"
 
if you give the hole positional tolerance it then is allowed to be out of form at MMC, seemingly violating the rule

The hole is not allowed to have any additional form error beyond what rule #1 dictates, unless otherwise specified. A position tolerance does not count as "otherwise specified". Your position tolerance is applied at MMC therefore your rule #1 boundary requires perfect form at MMC - your feature may not violate a boundary of perfect form of .490 . If your hole size is .490, no further form error is allowed. However, the hole may have location and/or orientation error ie: it is allowed to shift/rotate up to the .01 specified in your FCF.

Lets imagine it as a series of gauges. Your rule #1 gauge is a free-floating gauge pin of size .490 which must be able to pass through your hole. Your gauge for the position tolerance is a pin of size .480 pressed into a plate which has simulators for A|B|C. To verify your position tolerance your part is placed on the latter gauge, the pin must be able to pass through the hole when in contact with the simulators for A,B, and C. The part must satisfy BOTH gauges to pass.

Below is a list of the exceptions to rule #1. These are the ONLY exceptions to rule #1 allowed in the standard (besides a note that literally states "RULE #1 DOES NOT APPLY" or similar) which count as "otherwise specified".

ASME Y14.5-2018 para 5.8.2 said:
(a) items identified as stock, such as bars, sheets, tubing, structural shapes, and other items produced to established industry or government standards that prescribe limits for straightness, flatness, and other geometric characteristics. Unless geometric tolerances are specified on the drawing of a part made from these items, standards for these items govern the surfaces that remain in the as-furnished condition on the finished part.
(b) tolerances applied with the free state modifier.
(c) when form tolerances of straightness or flatness are applied to a feature of size. See paras. 8.4.1.3 and 8.4.2.1.
(d) when the “independency” symbol is used. See Figure 5-10 and para. 6.3.24.
CAUTION: Without a supplementary form control, the feature form is uncontrolled where the “independency” symbol is applied.
(e) when average diameter is specified. See subsection 8.5.
 
Rule #1 (ASME) requires perfect form at MMC for Regular Features of Size. It does not required perfect orientation or perfect location. A RFOS can have perfect form and still be less than perfect for its orientation and/or location.
 
A regular FOS may be at MMC, may have an orientation and/or location error, and still not have perfect form [wink] It all depends on what one means by "a FOS is at MMC".
 
Thanks for the help. For some reason I felt form included all the other geometric characteristics for this topic. I know form and orientation are separate tolerance types, but I thought when they used 'form' in the envelope rule it encompassed all of them. I got confused that a hole could tilt at MMC yet wasn't allowed to deviate in perfect form. I thought perfect form included being perpendicular.
 
pmarc,

I fully agree - I was avoiding that just for simplicity sake and explanation purposes. Maybe that was not wholly wise?

Typically I assume "a FOS at MMC" to mean a FOS that is at the MMC size at all cross-sections. That is to say that both actual values for the feature have r=r[sub]MMC[/sub]. Perhaps thats not the most useful way of thinking about it, but its the way I process it - maybe it would be better to discuss it more directly in terms of simply that form error which violates the rule #1 MMC perfect form boundary is not allowed? Or that your UAME must be >= MMC size for a feature for which rule #1 applies
 
chez311,

I understand.

Your assumption of "a FOS at MMC" is exactly how I think about perfect form at MMC imposed by Rule #1.

However, for orientation or position tolerancing at MMC, "a FOS at MMC" merely refers to the UAME size of the FOS equal to the MMC size. A FOS with UAME size = MMC size does not have to have perfect form.
 
Status
Not open for further replies.

Part and Inventory Search

Sponsor